Navigating life with back pain can be a daily, debilitating struggle, affecting everything from simple movements to your overall quality of life. While it's tempting to think rest is the best medicine, the reality is that targeted, gentle movement is often the most effective key to lasting relief. The right exercises can strengthen crucial supporting muscles, improve spinal mobility, and directly address the underlying causes of chronic discomfort. This is why understanding the best exercises for back pain is so critical for regaining control and function.
This guide moves past generic advice to provide a detailed, practical breakdown of eight highly effective exercises, chosen specifically for their safety and proven benefits. We will explore not just what to do, but precisely how to perform each movement correctly for maximum impact, ensuring you build a foundation of strength and flexibility. For those seeking a more structured and personalised recovery plan, a holistic approach that includes guidance on various therapeutic methods, such as professional physiotherapy, can provide invaluable support. This article empowers you to take a proactive step towards a more comfortable, active, and pain-free life.
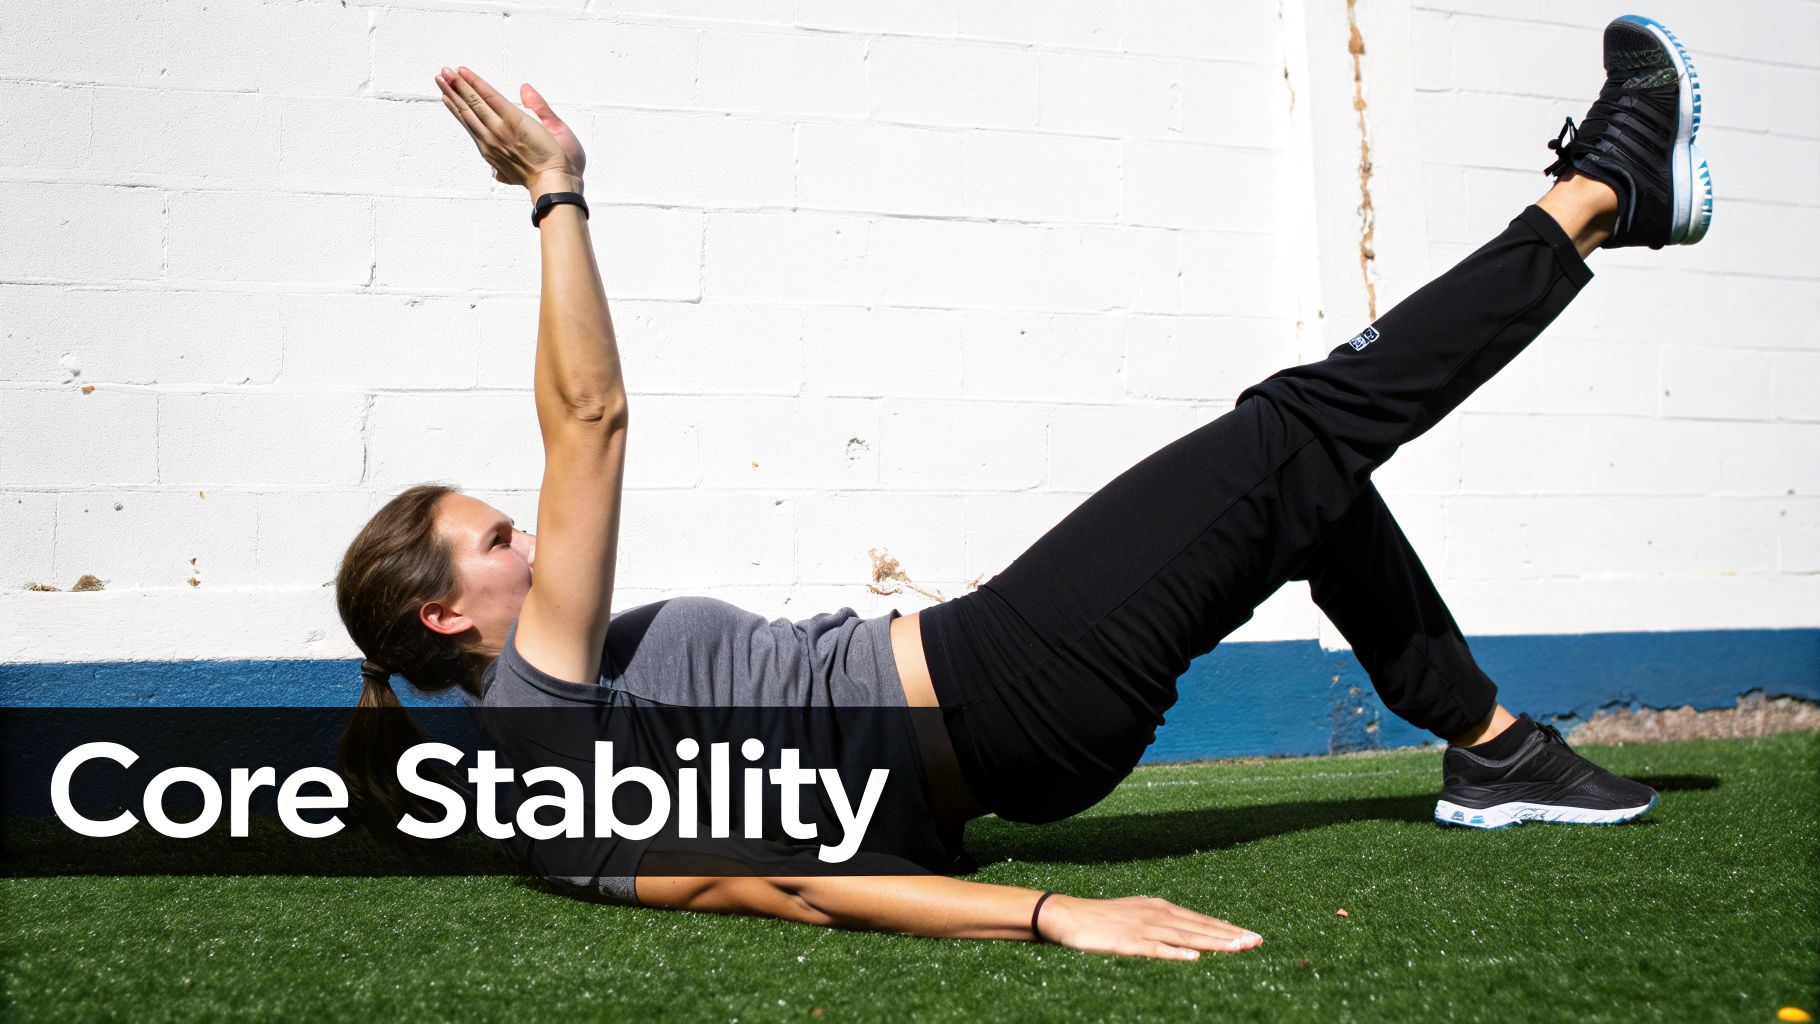
Master the Dead Bug Exercise for Core Stability and Back Pain Relief
The Dead Bug is a foundational exercise for improving spinal stability and reducing back discomfort. Performed lying on your back, it teaches your core muscles to work in concert, protecting your spine from unwanted stress during daily activities. The primary goal is to maintain a stable pelvis and a neutral lumbar spine while moving your opposite arm and leg, a pattern that directly translates to better control when walking, lifting, or bending.
Its gentle, controlled nature makes it one of the best exercises for back pain, particularly for those just beginning a rehabilitation programme. It targets the deep abdominal muscles, such as the transverse abdominis, which act as a natural corset for your spine.
Why It's Effective for Back Pain
The genius of the Dead Bug lies in its ability to challenge the core without putting the lumbar spine under high load or forcing it into flexion, unlike crunches or sit-ups. It reinforces the critical mind-muscle connection needed to engage your core before movement occurs, a protective mechanism that is often delayed or absent in individuals with chronic back pain.
Key Insight: Championed by leading spine biomechanics researchers like Dr. Stuart McGill, the Dead Bug is considered a non-negotiable exercise for building a resilient, "pain-proof" back. Its inclusion in countless physical therapy protocols worldwide speaks to its safety and efficacy.
How to Perform the Dead Bug Correctly
- Starting Position: Lie on your back with your knees bent and feet flat on the floor. Raise your legs so your shins are parallel to the floor, creating a 90-degree angle at your hips and knees (the "tabletop" position). Extend your arms straight up towards the ceiling.
- Core Engagement: Gently press your lower back into the floor to engage your abdominal muscles. You should feel tension in your core, not your back or neck.
- The Movement: Exhale slowly as you lower your right arm and left leg toward the floor simultaneously. Go only as far as you can without letting your lower back arch off the floor.
- Return and Repeat: Inhale as you bring your arm and leg back to the starting position with control. Repeat on the opposite side, lowering your left arm and right leg. That completes one repetition.
Pro-Tip: If maintaining a flat back is difficult, start by only moving your arms or only your legs. Progress to the full movement once you can perform the modified versions without any arching in your lower back.
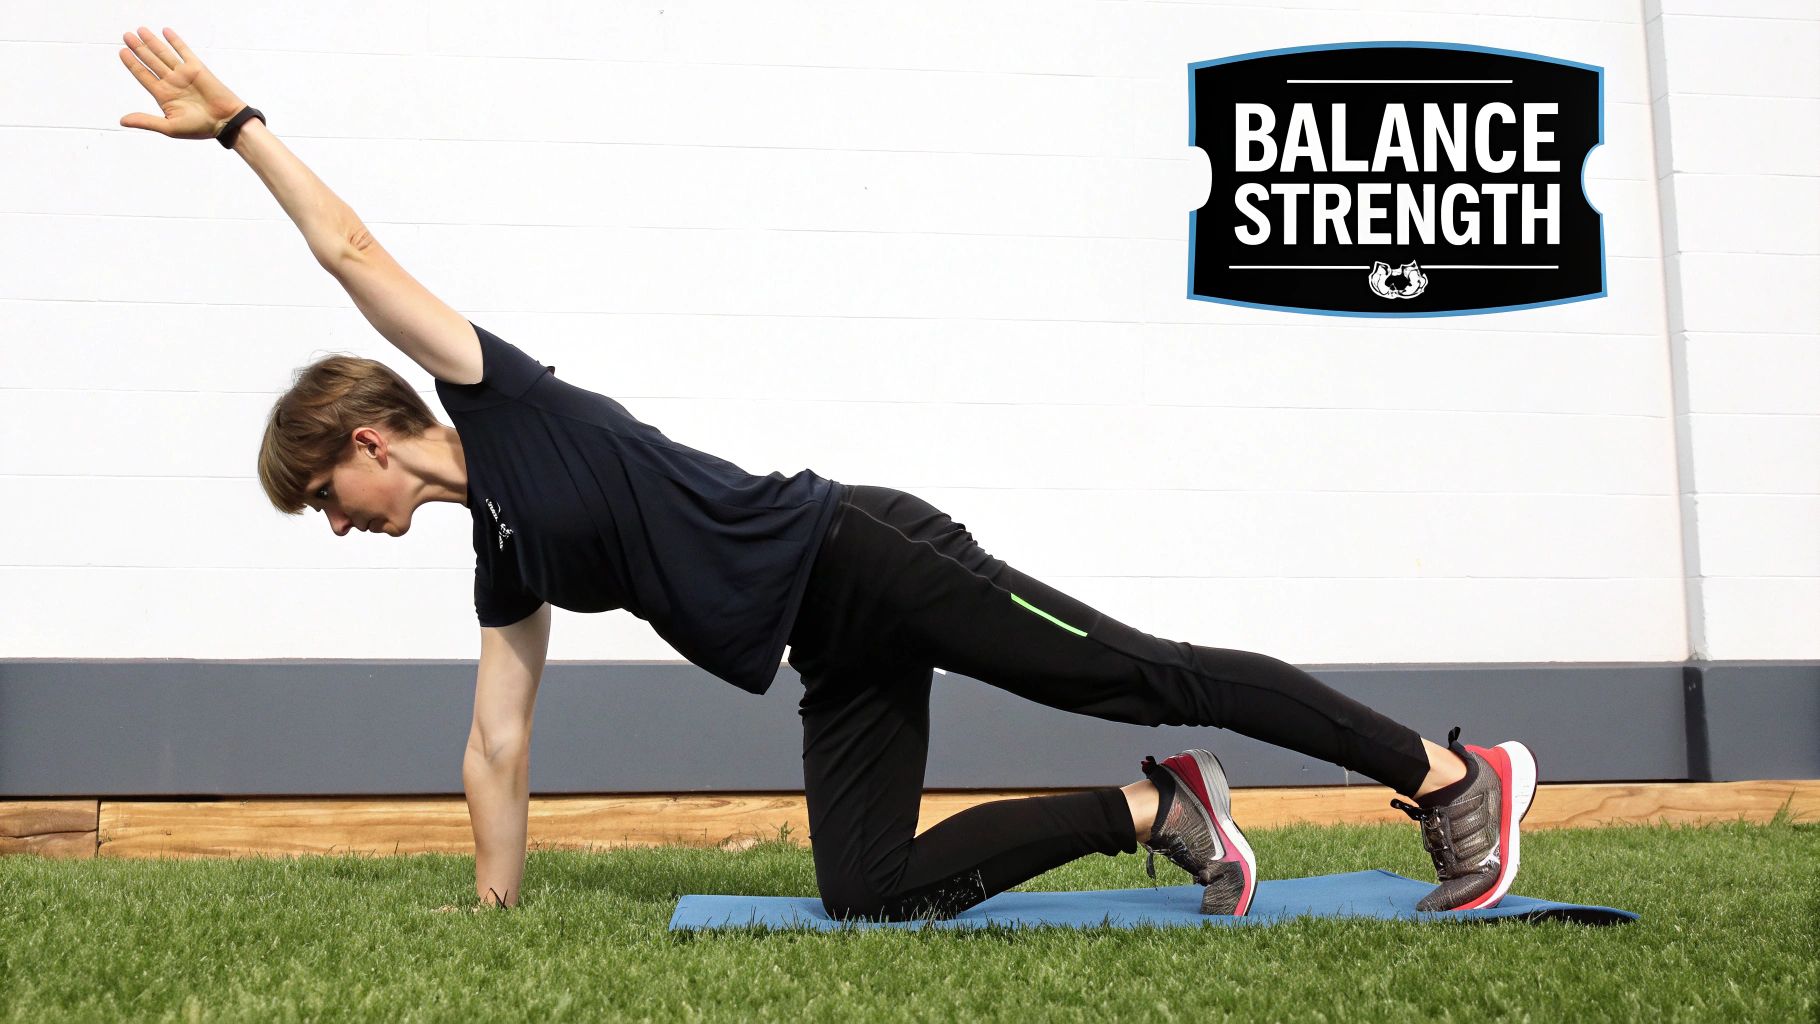
2. Bird Dog
The Bird Dog is a classic core stabilisation exercise that strengthens the muscles supporting your spine from a hands-and-knees position. By extending the opposite arm and leg, you challenge your body's ability to resist rotational forces and maintain a neutral spine. This controlled movement builds endurance in the deep back muscles, including the multifidus and erector spinae, which are crucial for spinal health.
As one of the best exercises for back pain, its low-impact nature makes it safe for most people, including those recovering from injury or new to exercise. It effectively teaches the brain and body to coordinate, creating a stiff, stable torso that protects the lower back during everyday movements like reaching or lifting.
Why It's Effective for Back Pain
The Bird Dog excels by co-contracting the muscles on both the front and back of the torso, creating a "super stiffness" that fortifies the spine against unpredictable loads. Unlike exercises that isolate a single muscle, the Bird Dog trains the entire core to function as an integrated unit. This functional strength is directly applicable to real-world scenarios, improving your balance and reducing the risk of re-injury.
Key Insight: Like the Dead Bug, the Bird Dog is a cornerstone of the methods popularised by Dr. Stuart McGill. It is favoured in professional rehabilitation protocols because it builds spinal endurance without imposing the compressive or shear forces that can aggravate back conditions.
How to Perform the Bird Dog Correctly
- Starting Position: Begin on all fours with your hands directly under your shoulders and your knees directly under your hips. Keep your back flat, imagining a glass of water balanced on your lower back.
- Core Engagement: Brace your abdominal muscles as if you are about to be pushed. Your head and neck should be in a neutral position, with your gaze directed at the floor.
- The Movement: Exhale as you slowly and simultaneously extend your right arm straight forward and your left leg straight back. Keep your hips and shoulders level, avoiding any twisting or arching.
- Return and Repeat: Inhale as you bring your arm and leg back to the starting position with deliberate control. Repeat on the opposite side, extending your left arm and right leg. That completes one repetition.
Pro-Tip: To ensure your hips remain level, focus on keeping them parallel to the floor throughout the movement. If you find this difficult, start by lifting only one limb at a time until your stability improves.
3. Cat-Cow Stretch
The Cat-Cow stretch, known in yoga as Marjaryasana-Bitilasana, is a gentle, dynamic movement that is highly beneficial for improving spinal flexibility and easing back tension. Performed on all fours, it fluidly moves the spine through flexion (rounding like a cat) and extension (arching like a cow). This motion helps to lubricate the spinal discs, release tightness in the surrounding muscles, and improve overall awareness of your back's position.
Its fundamental nature makes it one of the best exercises for back pain, particularly for warming up the spine or relieving stiffness after long periods of sitting. It is a cornerstone of many therapeutic back care programmes because it encourages controlled movement without placing excessive strain on the spine, making it accessible even during periods of discomfort.

Why It's Effective for Back Pain
The power of the Cat-Cow stretch is in its ability to gently mobilise the entire length of the spine, from the neck down to the tailbone. This movement increases circulation to the discs and muscles, helping to reduce stiffness and improve the spine's ability to move through its natural range of motion. It also helps to synchronise breath with movement, which can calm the nervous system and reduce the muscle guarding often associated with chronic pain.
Key Insight: This stretch is celebrated in both ancient yoga traditions and modern physical therapy for its profound effect on spinal health. It serves not just as a stretch but as a diagnostic tool, helping you identify specific areas of stiffness in your back. Its inclusion in programmes focused on improving posture highlights its role in re-educating spinal alignment.
How to Perform the Cat-Cow Stretch Correctly
- Starting Position: Begin on your hands and knees in a "tabletop" position. Ensure your wrists are directly under your shoulders and your knees are directly under your hips. Keep your head in a neutral position, with your eyes looking at the floor.
- Cow Pose: Inhale as you drop your belly towards the floor. Lift your chest and chin, and gaze upwards, allowing your lower back to arch gently.
- Cat Pose: Exhale as you press your hands firmly into the floor and round your spine up towards the ceiling. Tuck your chin into your chest and let your head hang heavy, feeling a stretch across your upper back.
- Return and Repeat: Inhale to flow back into Cow Pose. Continue moving smoothly between the two poses, coordinating your breath with each movement. Aim for 8-10 repetitions.
Pro-Tip: Focus on initiating the movement from your tailbone and allowing it to travel up your spine like a wave. This ensures you are mobilising each segment of your back rather than just hinging from one spot.
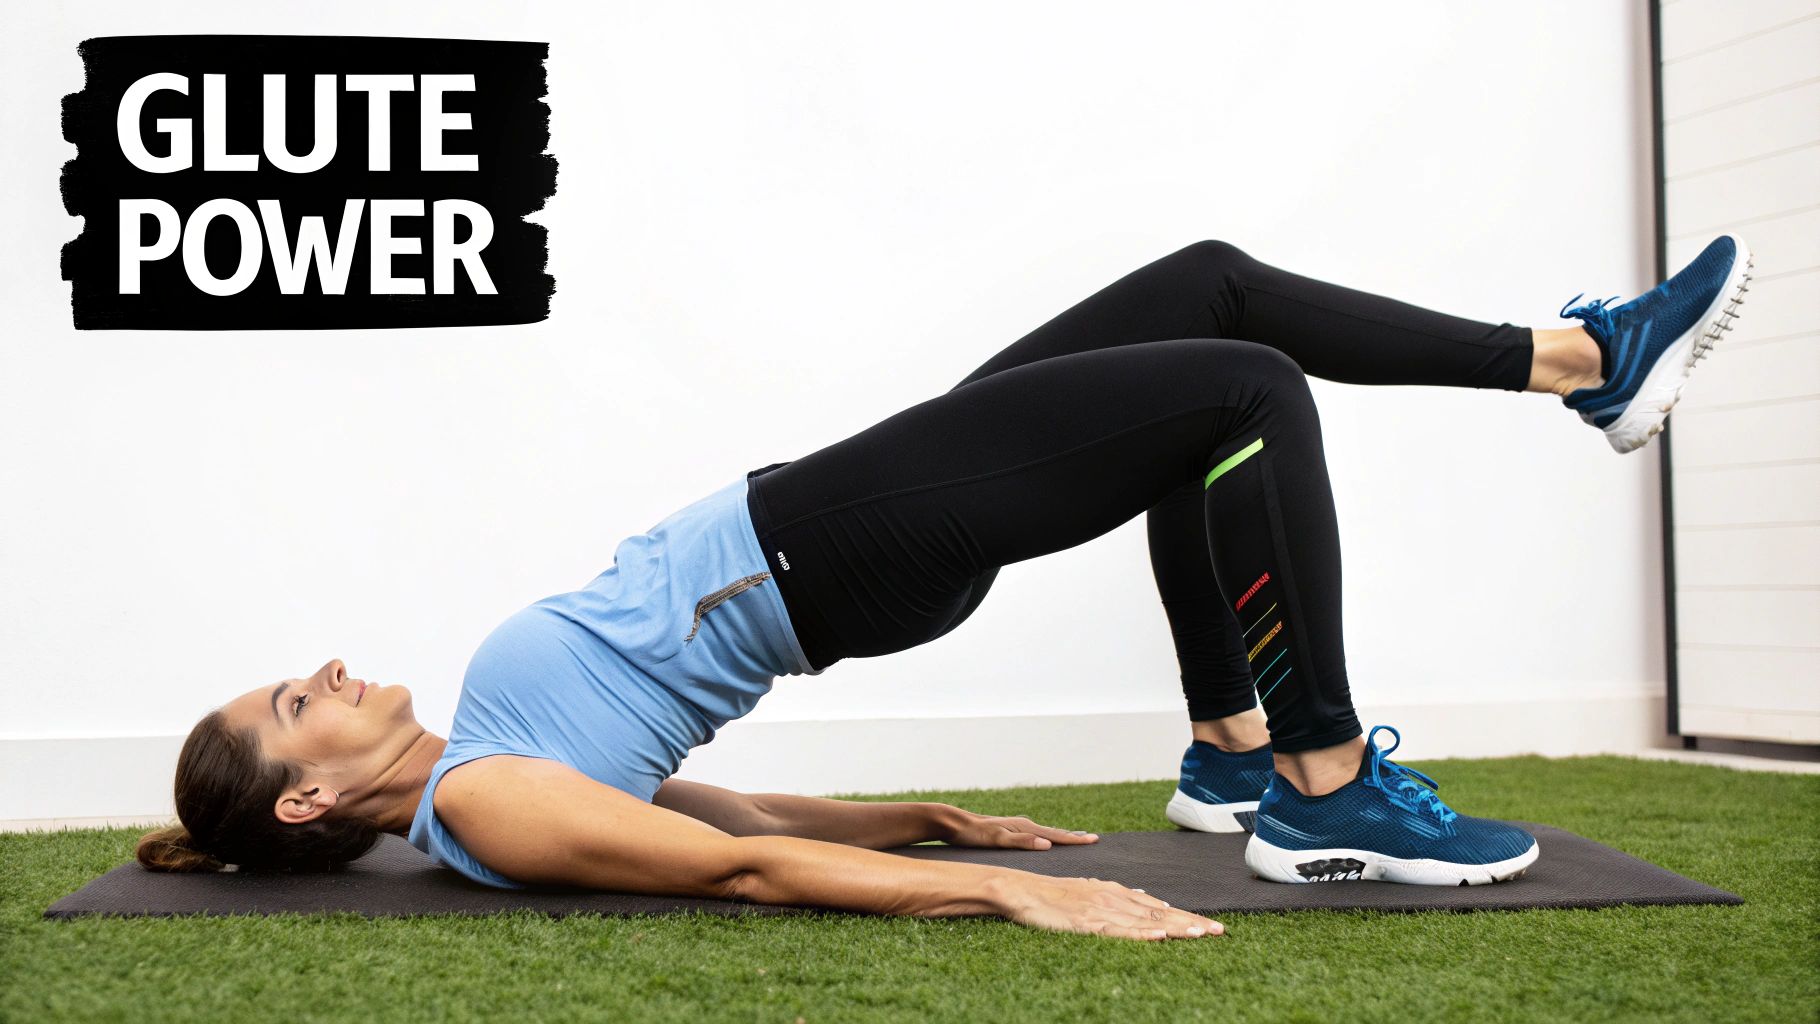
4. Glute Bridge
The Glute Bridge is a powerful yet simple exercise designed to activate and strengthen the gluteal muscles. Performed lying on your back, it involves lifting your hips off the floor, which addresses a common root cause of back pain: dormant or weak glutes. When your glutes don't fire properly, your lower back often compensates, leading to strain and discomfort.
Strengthening the glutes with this movement helps to stabilise the pelvis and provides better support for the lumbar spine. Its accessibility makes it one of the best exercises for back pain, suitable for nearly all fitness levels and a cornerstone of many successful rehabilitation and strength training programmes.
Why It's Effective for Back Pain
The Glute Bridge excels because it isolates the glutes and hamstrings without placing compressive or shearing forces on the spine. It teaches you to create hip extension using the correct muscles, a fundamental pattern for pain-free movement when lifting, climbing stairs, or even just standing up. Activating these muscles helps to correct pelvic tilt and improves overall posture.
Key Insight: Popularised by specialists like Bret Contreras and incorporated into functional movement systems by experts such as Gray Cook, the Glute Bridge is celebrated for its ability to "wake up" the glutes. This gluteal activation is critical for restoring a balanced muscular system where the hips, not the lower back, drive powerful movements.
How to Perform the Glute Bridge Correctly
- Starting Position: Lie on your back with your knees bent, feet flat on the floor about hip-width apart, and your arms resting by your sides with palms down. Your feet should be close enough that you can just touch your heels with your fingertips.
- Core Engagement: Gently brace your core, as if preparing for a light punch to the stomach. This helps prevent your back from arching during the lift.
- The Movement: Exhale and push through your heels to lift your hips off the floor. Squeeze your glutes firmly at the top to create a straight line from your shoulders to your knees. Avoid over-extending or arching your lower back.
- Hold and Return: Hold the top position for 2-3 seconds, keeping your glutes engaged. Inhale as you slowly lower your hips back to the starting position with control. That completes one repetition.
Pro-Tip: To ensure your glutes are doing the work, focus on the squeeze at the top rather than just using your legs to push up. Once you have mastered the basic form, you can progress to single-leg variations for a greater stability challenge. For a detailed guide on performing the Glute Bridge exercise correctly, consider this resource.
5. Modified Plank
The Modified Plank is an accessible yet powerful exercise designed to build core endurance without overburdening the lumbar spine. It serves as a crucial stepping stone to the full plank, allowing individuals to develop foundational strength and proper spinal alignment. By performing the exercise from the knees or against an incline, the load on the lower back is significantly reduced, making it a safer option for those experiencing discomfort.
This variation focuses on teaching the body to maintain a rigid, straight line from head to knees (or feet, in an incline), engaging the deep stabilising muscles of the core. Its inclusion in numerous physical therapy and introductory fitness programmes highlights its value as one of the best exercises for back pain, particularly for beginners or those in the initial stages of recovery.
Why It's Effective for Back Pain
The Modified Plank excels at building isometric strength in the transverse abdominis, rectus abdominis, and obliques, which collectively support and protect the spine. Unlike dynamic exercises that involve spinal movement, the plank's static hold trains these muscles to resist motion and maintain stability, a key function for preventing back injuries during everyday tasks.
This exercise reinforces a neutral spine position under tension, a skill that is directly transferable to maintaining good posture throughout the day. For those looking for effective strategies to relieve chronic back pain, mastering this foundational movement is an excellent first step.
Key Insight: The Modified Plank is a cornerstone of spinal rehabilitation because it builds endurance in the torso muscles without compromising the spine. This focus on endurance, rather than just strength, is critical for maintaining spinal stability over long periods, such as sitting at a desk or standing.
How to Perform the Modified Plank Correctly
- Starting Position: Begin on all fours, with your hands directly under your shoulders and your knees under your hips. Walk your hands forward slightly and lower your hips so your body forms a straight line from your head to your knees.
- Core Engagement: Brace your abdominal muscles as if you are about to be punched in the stomach. Squeeze your glutes to help stabilise your pelvis and prevent your lower back from sagging.
- The Hold: Maintain this position, keeping your back flat and your neck in line with your spine (avoid looking up or letting your head drop). Breathe steadily and deeply throughout the hold.
- Duration: Aim to hold the position for 15-30 seconds initially. As you get stronger, gradually increase the duration of your hold, focusing on maintaining perfect form.
Pro-Tip: If the knee plank is still too challenging, start with an incline plank. Place your hands on a wall, kitchen counter, or sturdy chair. The higher the incline, the less load is placed on your core and spine, allowing you to build strength progressively.
6. Knee-to-Chest Stretch
The Knee-to-Chest Stretch is a fundamental and highly accessible movement designed to alleviate tension in the lumbar region. Performed while lying on your back, it involves gently drawing one or both knees towards your chest, which helps to decompress the lower spine and stretch the gluteal and hamstring muscles that can contribute to back tightness.
This gentle flexion provides immediate, soothing relief for many types of lower back pain. It is a cornerstone of home exercise programmes and is often recommended by healthcare professionals as a first-line approach for managing acute back stiffness, making it one of the best exercises for back pain for both beginners and seasoned individuals.
Why It's Effective for Back Pain
The effectiveness of the Knee-to-Chest Stretch lies in its simplicity and direct action. It gently lengthens the muscles of the lower back (erector spinae) and hips, reducing muscular tension and pressure on the spinal nerves. By flexing the lumbar spine, it can also help to increase the space between vertebrae, providing temporary relief from nerve root compression.
This stretch is particularly beneficial after long periods of sitting or standing, which can cause the lower back muscles to shorten and tighten. Its calming nature also encourages relaxation, which is a key component in breaking the pain-tension cycle associated with chronic discomfort.
Key Insight: This stretch is a staple in widely recognised physical therapy protocols, including principles from the McKenzie Method, for its ability to provide safe and controlled lumbar flexion. Its frequent recommendation in emergency departments for acute back pain underscores its established safety and immediate benefits.
How to Perform the Knee-to-Chest Stretch Correctly
- Starting Position: Lie comfortably on your back on a firm but padded surface, with both knees bent and your feet flat on the floor. Keep your head and neck relaxed on the floor.
- Core Engagement: Gently tighten your abdominal muscles to help stabilise your pelvis and protect your lower back.
- The Movement: Exhale and slowly draw your right knee up towards your chest. Clasp your hands either behind your thigh or over your shin and gently pull the knee closer until you feel a comfortable stretch in your lower back and hip.
- Hold and Repeat: Hold the stretch for 30-60 seconds, breathing deeply and evenly. Release the leg back to the starting position with control. Repeat with the left leg. For a deeper stretch, you can perform it with both knees at once.
Pro-Tip: For a slightly different sensation, try gently rocking from side to side while holding the knee(s) to your chest. This can provide a massaging effect for the muscles along either side of your spine.
7. Pelvic Tilt
The Pelvic Tilt is a subtle yet powerful foundational movement for re-educating the muscles that stabilise the lower back. Performed while lying down, it involves gently rocking the pelvis to flatten the lumbar spine against the floor, which helps to activate deep abdominal muscles and release tension in tight lower back muscles. It is a cornerstone exercise for developing awareness of spinal alignment.
Its simplicity and low-impact nature make it one of the best exercises for back pain, particularly during acute flare-ups or as a warm-up. By focusing on the small, controlled movement of the pelvis, it strengthens the core without placing stress on the spine, making it incredibly safe and effective for almost everyone.
Why It's Effective for Back Pain
The Pelvic Tilt directly targets the relationship between the pelvis, lumbar spine, and abdominal muscles. For many people with back pain, the pelvis is stuck in an anterior tilt (arched back), which puts continuous strain on the spinal joints and muscles. This exercise actively corrects that posture by strengthening the muscles responsible for bringing the pelvis back to a neutral position.
It also improves neuromuscular control, teaching your brain and core to work together to hold a stable, pain-free posture throughout the day. Because of its effectiveness in stabilising the pelvis, it is often a key exercise in protocols for managing conditions like sacroiliac joint dysfunction. Explore further details on how pelvic stability aids in treating sacroiliac joint pain.
Key Insight: This movement is a fundamental component of the Williams flexion exercises and a core principle in Pilates, both of which have been used for decades in spinal rehabilitation. Its value lies in re-establishing basic motor control that is often lost due to chronic pain.
How to Perform the Pelvic Tilt Correctly
- Starting Position: Lie on your back with your knees bent and feet flat on the floor, about hip-width apart. Your arms should be resting comfortably at your sides. Allow your back to be in a relaxed, neutral position; you should have a small curve in your lower back.
- Core Engagement: Gently exhale and engage your abdominal muscles as if you are bracing for a light punch. Use these muscles to gently press your lower back into the floor.
- The Movement: As you press your back down, your pelvis will rock backwards or "tilt" up slightly towards your head. Hold this gentle contraction for 3-5 seconds. The movement should be small and controlled, originating from your core, not from pushing with your legs.
- Return and Repeat: Inhale as you relax your muscles, allowing your pelvis and spine to return to the neutral starting position. Repeat for 10-15 repetitions.
Pro-Tip: Place your hands on your hip bones to feel the tilting motion. Focus on breathing deeply throughout the exercise; exhaling during the tilt helps deepen the abdominal contraction.
8. Wall Sit
The Wall Sit is a powerful isometric exercise that builds endurance in the lower body and core. By holding a seated position against a wall, as if in an invisible chair, you strengthen the quadriceps, glutes, and hamstrings without moving the joints, making it a low-impact option. This is crucial because strong legs and glutes act as the primary support system for your pelvis and lower back.
When your lower body is strong, it takes a significant amount of strain off your lumbar spine during daily activities like standing up from a chair, climbing stairs, or lifting objects. The Wall Sit's focus on static strength helps improve postural endurance, allowing you to maintain a healthy spinal alignment for longer periods, which is why it is considered one of the best exercises for back pain management and prevention.
Why It's Effective for Back Pain
The effectiveness of the Wall Sit lies in its ability to build foundational strength without spinal loading or movement. Unlike squats or lunges, which require dynamic control, the Wall Sit isolates the leg and glute muscles in a stable, supported position. This allows you to build muscular endurance, which is vital for preventing the fatigue that often leads to poor posture and subsequent back ache.
By teaching your body to engage the legs and core to hold a challenging position, you are re-training neuromuscular patterns that protect the spine. It reinforces the idea of using your powerful leg muscles to do the heavy lifting, sparing your more vulnerable back structures.
Key Insight: A staple in athletic conditioning, particularly for skiers who need immense leg endurance to absorb shock and protect their backs, the Wall Sit is a perfect example of indirect back care. By strengthening the body's support structures, you create a more resilient and stable foundation for the spine.
How to Perform the Wall Sit Correctly
- Starting Position: Stand with your back flat against a smooth wall. Walk your feet forward about two feet from the wall, keeping them shoulder-width apart.
- Core Engagement: Engage your core by drawing your belly button towards your spine. Ensure your entire back, from your shoulders to your lower back, is pressed firmly against the wall.
- The Movement: Slowly slide your back down the wall until your thighs are parallel to the floor, as if you are sitting in a chair. Your knees should be directly above your ankles, forming a 90-degree angle.
- Hold and Repeat: Hold this position, focusing on steady breathing. Keep your weight evenly distributed through your heels. Aim for a 30-second hold to start, and work your way up to longer durations.
Pro-Tip: To ensure proper form, imagine you are trying to slide a piece of paper between your lower back and the wall; you should not be able to. Maintaining this contact is key to protecting your spine and maximising the exercise's benefits.
Top 8 Back Pain Exercises Comparison
| Exercise | Implementation Complexity 🔄 | Resource Requirements ⚡ | Expected Outcomes 📊 | Ideal Use Cases 💡 | Key Advantages ⭐ |
|---|---|---|---|---|---|
| Dead Bug | Low; requires focus on slow, controlled moves | None | Improved core stability and back pain relief | Beginners to rehab; core stabilization | Low spinal stress; adaptable; builds coordination |
| Bird Dog | Moderate; balance and limb coordination needed | None | Functional core strength, improved balance | Rehab, injury prevention, functional training | Strengthens posterior chain; enhances coordination |
| Cat-Cow Stretch | Low; gentle flowing movements | None | Increased spinal mobility and tension relief | Warm-up, cool-down, gentle back pain relief | Promotes flexibility; stress relief |
| Glute Bridge | Low to moderate; focus on proper glute activation | None; optional resistance possible | Stronger glutes and improved pelvis stability | Address weak glutes; posture correction | Targets common pain cause; scalable |
| Modified Plank | Moderate; isometric hold with alignment focus | None | Increased core endurance and spinal alignment | Beginners with back pain; progressive core training | Low spine load; easy monitoring |
| Knee-to-Chest Stretch | Very low; simple passive stretch | None | Immediate lower back tension relief | Acute lower back tension; gentle stretching | Provides quick relief; very safe |
| Pelvic Tilt | Very low; subtle pelvic movement | None | Deep core activation and spine positioning | Early-stage rehab; core awareness training | Safe for acute pain; foundational |
| Wall Sit | Low; isometric leg hold | Wall only | Increased leg/glute endurance supporting posture | Leg strength/endurance; low back support | Builds endurance; no spinal load |
Your Next Step Towards a Pain-Free Life
You have now explored a foundational set of the best exercises for back pain, each chosen for its ability to build strength, enhance flexibility, and promote spinal stability. From the core-engaging Dead Bug and Bird Dog to the gentle mobilisation of the Cat-Cow stretch and the targeted strengthening of the Glute Bridge, this collection provides a powerful toolkit for reclaiming control over your physical wellbeing. The key takeaway is not just which exercises to perform, but how and why they work.
Understanding the principles behind these movements is crucial. The goal is to create a resilient, well-supported spine by activating deep core muscles, correcting postural imbalances, and releasing tension in overworked areas. Consistency, as we have emphasised, is the bedrock of success. Integrating even a few of these exercises into your daily routine is a far more effective strategy than sporadic, intense workouts. Remember, this is a journey of gradual improvement, not a race to a finish line.
Key Principles for Lasting Relief
To truly benefit from these exercises, always prioritise the following principles:
- Form Over Repetitions: Executing one perfectly formed Glute Bridge is infinitely more beneficial than ten sloppy ones. Poor form can reinforce bad movement patterns and, in some cases, even exacerbate your discomfort.
- Listen to Your Body: Pain is a signal, not a challenge to be pushed through. Differentiate between the mild discomfort of muscle engagement and sharp, shooting, or worsening pain. If an exercise causes the latter, stop immediately.
- Breathe and Engage: Conscious, deep breathing helps to relax tense muscles and is integral to core engagement. Before each movement, focus on drawing your navel towards your spine to activate your deep abdominal muscles, creating a natural corset of support.
Creating a Sustainable Routine
The power of this knowledge lies in its application. Your next step is to transform this list from an article into an active part of your life. Start by selecting two or three exercises that feel most comfortable and accessible. Commit to performing them five days a week, focusing entirely on mastering the technique. As you build confidence and strength, you can gradually introduce more movements from the list, creating a balanced and comprehensive routine that addresses both strength and mobility.
This proactive approach is not merely about alleviating current pain; it is a long-term investment in your health. By building a stronger, more resilient back, you are actively preventing future injuries, improving your posture, and enhancing your overall quality of life. The ability to move freely, without fear of triggering pain, is a fundamental aspect of wellness that is well within your reach. Mastering these foundational exercises is the first, most empowering step on that path.
If you've consistently tried the best exercises for back pain but your progress has stalled or your symptoms persist, a personalised assessment can uncover the root cause. At Spine, Body & Health, our experienced team specialises in creating customised treatment plans to help you achieve lasting relief. Take the definitive step towards a pain-free life by booking your consultation with us today at Spine, Body & Health.