In a world where screens are a constant part of our daily lives, maintaining proper posture has become more challenging, yet more crucial than ever. Slouching over a desk, tablet, or phone can lead to a cascade of issues, from chronic back and neck pain to reduced mobility and even compromised breathing. The good news is that you have the power to counteract these effects. By integrating specific, targeted movements into your routine, you can retrain your muscles, realign your spine, and build a stronger foundation for long-term health.
This guide moves beyond generic advice to provide a practical blueprint for reclaiming your body's natural alignment. We will walk you through seven of the best posture correction exercises, delving into the mechanics of each movement. You will learn precisely how they work, how to perform them for maximum benefit, and the common mistakes to avoid. While these exercises are foundational, it's also important to build overall strength. Beyond specific posture correction moves, strengthening the core muscles that support your spine is vital. Explore more exercises specifically targeting back muscles to further enhance your spinal health.
Prepare to unlock a more confident, pain-free way of moving as we explore these effective techniques.
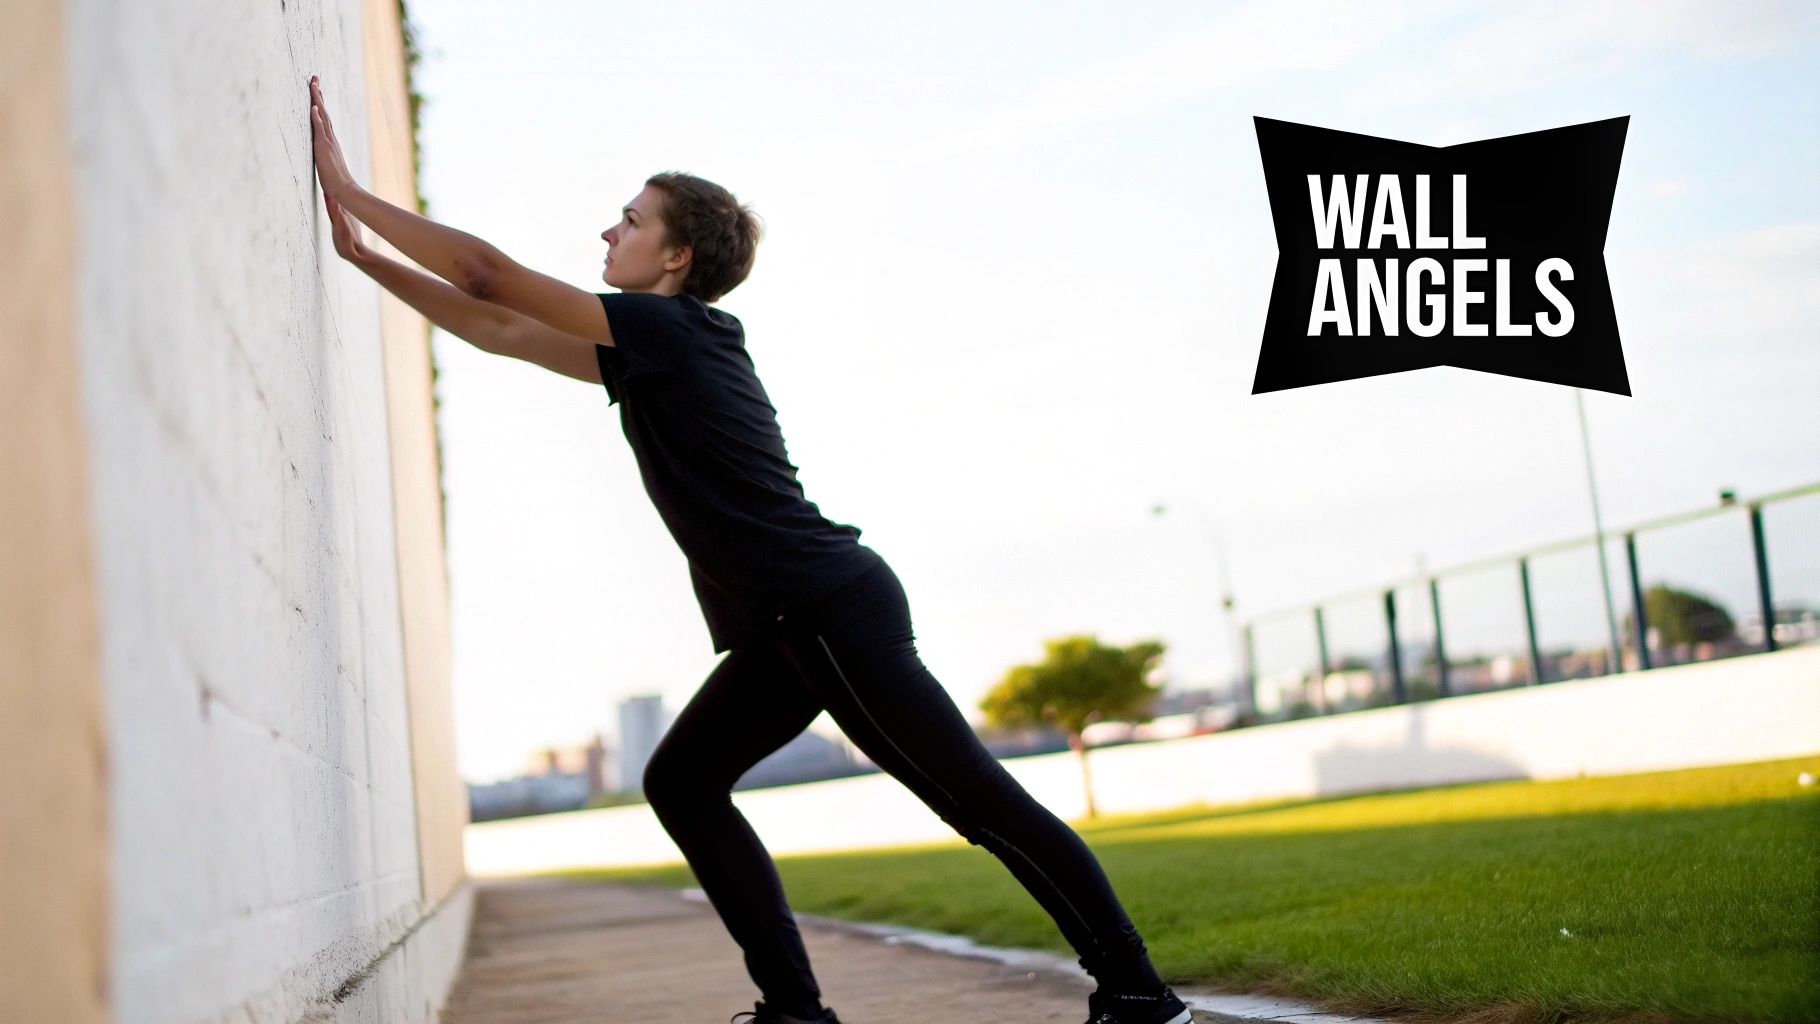
Wall Angels: Improve Shoulder Mobility & Posture Alignment
Often recommended by spinal health specialists and physical therapists, the Wall Angel is a foundational exercise for correcting postural imbalances. It’s a deceptively simple movement that involves mimicking a snow angel while standing against a wall. Its primary function is to combat the effects of a sedentary lifestyle, particularly the forward head posture and rounded shoulders commonly seen in individuals who spend long hours at a desk. By strengthening key upper back muscles like the rhomboids and lower trapeuscles, Wall Angels help retract the shoulder blades into a more neutral, healthy position.
This exercise is one of the best posture correction exercises because it simultaneously strengthens weakened posterior muscles while stretching tight anterior muscles, such as the pectorals in the chest. This dual-action approach re-educates your neuromuscular system, teaching your body how to hold itself in proper alignment naturally.
How to Perform Wall Angels Correctly
Executing Wall Angels with proper form is crucial for effectiveness and to avoid strain. The wall provides essential feedback, helping you maintain alignment throughout the movement.
- Starting Position: Stand with your back flat against a wall. Your feet should be about six inches away from the wall, with a slight bend in your knees.
- Points of Contact: Ensure your head, shoulder blades, and glutes are all touching the wall. Try to gently flatten your lower back against the wall, engaging your core to minimise the arch.
- Arm Placement: Raise your arms to your sides, bent at a 90-degree angle, with the backs of your hands and elbows pressed against the wall. This is your starting "W" position.
- The Movement: Slowly slide your arms up the wall in an arc, aiming to straighten them overhead into a "Y" position without losing contact with the wall. Move only as high as you can while keeping your elbows and wrists against the wall.
- Return: Gently slide your arms back down to the starting 90-degree position.
Key Insight: The goal isn't to achieve a full range of motion immediately. The primary focus should be on maintaining contact between your back, shoulders, and arms with the wall. This ensures you are activating the correct postural muscles.
Common Mistakes and Tips
- Arching the Lower Back: Actively engage your abdominal muscles to keep your lower back as close to the wall as possible.
- Letting Elbows Lift Off: If your elbows or wrists lift off the wall, you've gone too far. Reduce your range of motion to a point where you can maintain full contact.
- Shrugging the Shoulders: Keep your shoulders pulled down and away from your ears throughout the exercise.
For a visual guide on perfect form, review this video demonstration:
Practise one set of 10-15 slow, controlled repetitions, 2-3 times daily. Incorporating this into your routine can provide significant relief and lay the groundwork for a stronger, more aligned posture.
2. Cat-Cow Stretch
A cornerstone of yoga and spinal mobility routines, the Cat-Cow Stretch is a gentle, dynamic movement that is fundamental for maintaining a healthy spine. Performed on all fours, it involves flowing between spinal flexion (rounding the back like a cat) and extension (arching the back like a cow). This exercise is exceptional for relieving tension in the neck, shoulders, and torso, making it an ideal counter-movement for the static, forward-hunching posture many adopt while sitting at a desk or using a computer.
The Cat-Cow Stretch is one of the best posture correction exercises because it promotes flexibility and awareness throughout the entire spinal column. By moving through both flexion and extension, it helps restore the natural S-curve of the spine, enhances blood flow to the discs between vertebrae, and gently mobilises the hips and shoulders. This increased body awareness is crucial for recognising and correcting poor postural habits during everyday activities.

How to Perform the Cat-Cow Stretch Correctly
Proper form and mindful breathing are key to unlocking the full benefits of this stretch. The focus should be on creating a fluid, controlled motion rather than forcing the range of movement.
- Starting Position: Begin on your hands and knees in a "tabletop" position. Align your wrists directly under your shoulders and your knees directly under your hips.
- Neutral Spine: Keep your head in a neutral position, with your gaze soft and directed towards the floor. Your back should be flat.
- Cow Pose: As you inhale, gently drop your belly towards the floor. Lift your chest and chin, tilting your tailbone up towards the ceiling to create an arch in your spine.
- Cat Pose: As you exhale, round your spine towards the ceiling, tucking your chin into your chest and drawing your navel towards your spine. Press firmly into your hands to get a good stretch between your shoulder blades.
- Flow: Continue to flow smoothly between Cat and Cow poses, coordinating each movement with your breath.
Key Insight: The power of this exercise lies in the connection between breath and movement. Let your breath guide the pace, moving slowly and deliberately to articulate each vertebra of your spine.
Common Mistakes and Tips
- Moving Too Quickly: This is a mindful stretch, not a race. A slow, controlled pace enhances neuromuscular connection and prevents strain.
- Overextending the Neck: In Cow pose, avoid cranking your neck back. Instead, keep the back of your neck long and lift from your chest.
- Forgetting to Engage the Core: In Cat pose, actively pull your belly button towards your spine to fully engage your abdominal muscles and support your lower back.
For a clear visual on achieving the perfect flow, watch this instructional video:
Aim for one set of 10-15 repetitions daily, especially in the morning to awaken the spine or as a break during long periods of sitting. Its gentle nature makes it an accessible yet powerful tool for improving spinal health and posture.
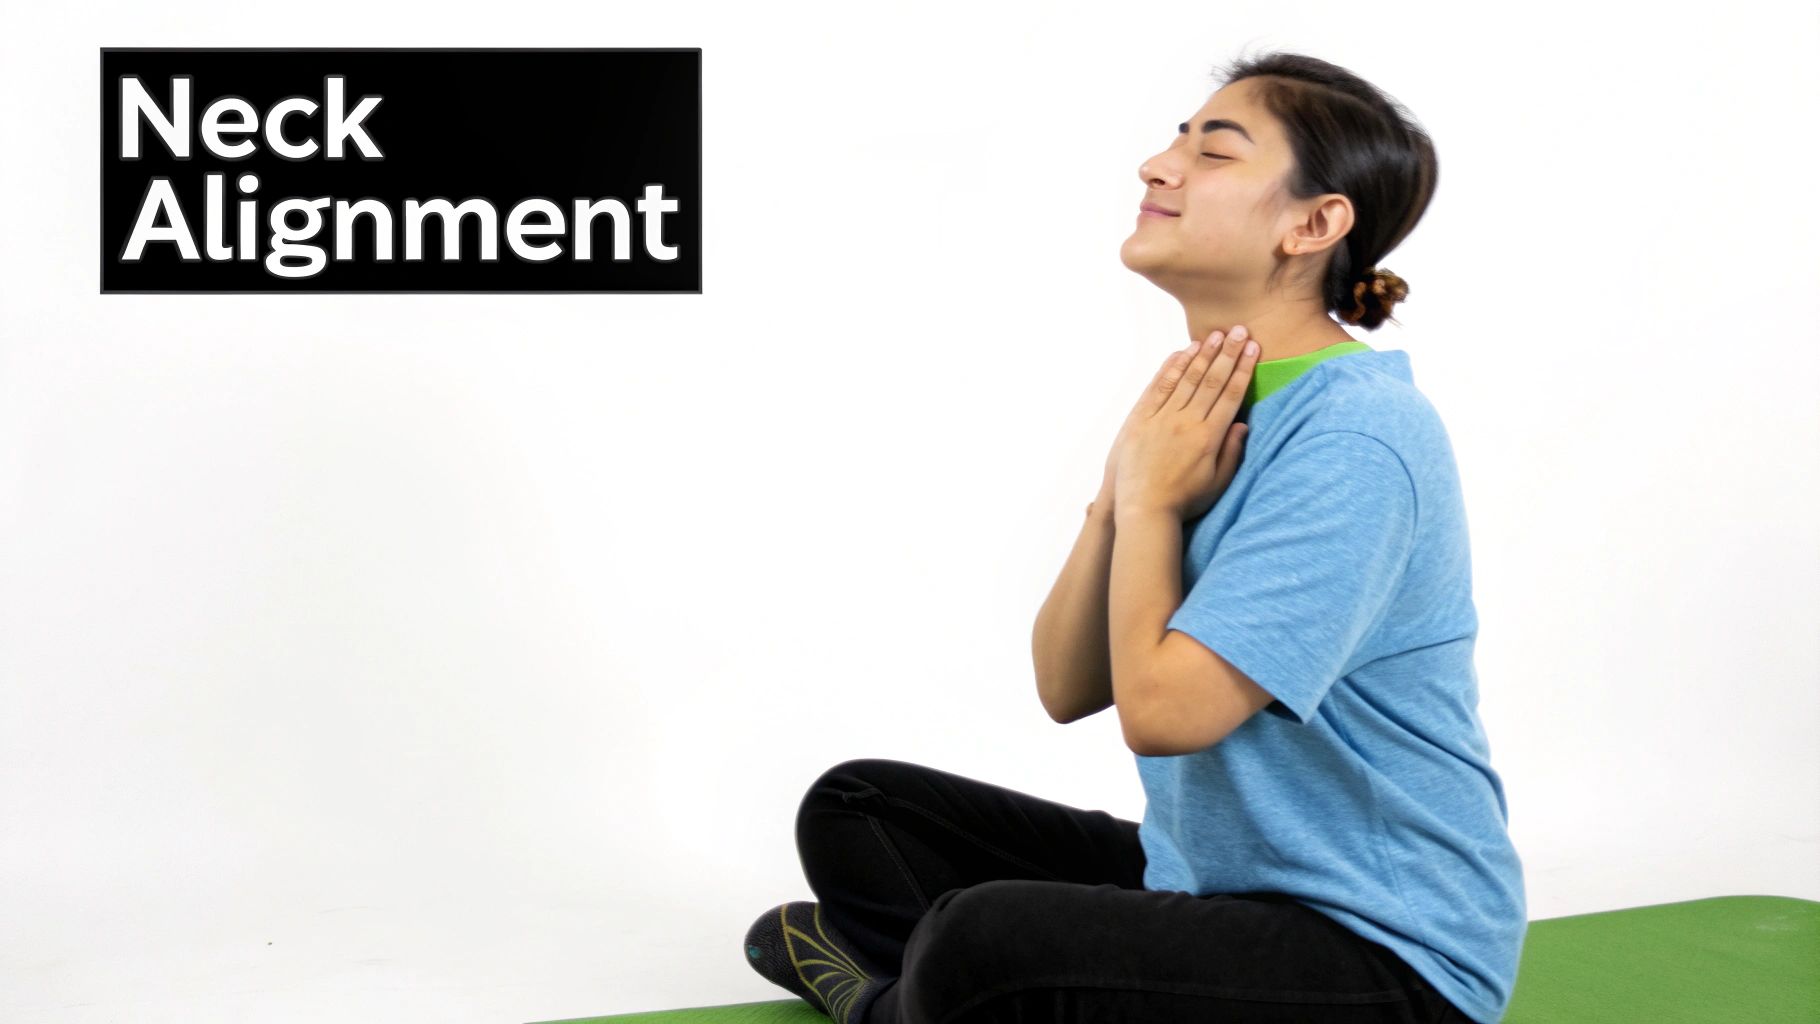
3. Chin Tucks
A cornerstone exercise for tackling "tech neck," the Chin Tuck is a subtle yet powerful movement aimed at correcting forward head posture. This common postural issue, where the head juts forward from the shoulders, places immense strain on the neck and upper back. The Chin Tuck specifically targets and strengthens the deep neck flexor muscles at the front of the neck, which are often weak, while simultaneously stretching the tight suboccipital muscles at the base of the skull.
This exercise is considered one of the best posture correction exercises because it directly re-educates the neuromuscular system on how to hold the head in proper alignment over the spine. Its simplicity means it can be performed anywhere, making it an accessible and effective tool for anyone spending significant time looking at screens, from office workers to students. Regular practice helps to alleviate neck pain, reduce tension headaches, and restore the natural curve of the cervical spine.
How to Perform Chin Tucks Correctly
Proper form is paramount to isolate the correct muscles and avoid creating further tension. The movement should be slow, deliberate, and free of pain.
- Starting Position: Sit or stand tall, looking straight ahead. Your shoulders should be relaxed and pulled back slightly.
- The Movement: Without tilting your head up or down, gently guide your chin and head straight back, as if you are making a "double chin." You should feel a gentle stretch at the back of your neck and an activation of the muscles in the front.
- The Hold: Hold this retracted position for 3-5 seconds, ensuring you continue to breathe normally.
- The Release: Slowly release the tension and return your head to a neutral starting position.
- Repetitions: Aim for 10 repetitions per set.
Key Insight: The movement is a horizontal glide, not a nod. Imagine a string pulling your head straight back, lengthening the back of your neck towards the ceiling. Your gaze should remain level throughout the entire exercise.
Common Mistakes and Tips
- Tilting the Head: Avoid looking down at your chest or up at the ceiling. Keep your eyes fixed on a point directly in front of you.
- Shrugging the Shoulders: Your shoulders should remain relaxed and down throughout the exercise. If they rise towards your ears, reset and begin again.
- Forcing the Movement: This should be a gentle stretch and muscle activation. Do not push to the point of pain or discomfort.
For a visual guide on perfect form, review this video demonstration:
To make this a habit, try performing a set of 10 repetitions every hour while working at a computer. As you progress, you can perform the exercise lying on your back without a pillow to work against gravity for an added challenge.
4. Thoracic Extension Mobility
Thoracic extension mobility targets the mid-back region (thoracic spine), a critical area that often becomes stiff and rounded from prolonged periods of sitting. This stiffness, known as kyphosis, is a primary contributor to a slouched posture, forward head position, and shoulder pain. Exercises focused on thoracic extension aim to restore the natural, healthy curve of your mid-back by improving its ability to bend backwards, which is essential for standing tall and moving efficiently. By unlocking this area, you alleviate strain on your neck and lower back, which often overcompensate for a rigid thoracic spine.
Improving this specific movement is one of the best posture correction exercises because it directly counteracts the "hunchback" effect of modern life. It's a foundational element in many high-performance and rehabilitative settings, from CrossFit gyms improving overhead lifting safety to swimming coaches enhancing stroke mechanics. Restoring mobility here allows your entire spine to function as an integrated system, distributing forces evenly and reducing the risk of injury.
How to Perform a Thoracic Extension Correctly
Using a foam roller is one of the most effective ways to mobilise the thoracic spine. This tool provides targeted pressure to encourage movement between the vertebrae.
- Starting Position: Sit on the floor with your knees bent and feet flat. Place a foam roller horizontally behind you.
- Placement: Lie back so the foam roller is positioned across your mid-back, roughly at the level of your shoulder blades. Clasp your hands behind your head to support your neck, keeping your elbows pointed towards the ceiling.
- Core Engagement: Lift your hips slightly off the floor, engaging your core muscles to protect your lower back from arching.
- The Movement: Keeping your core tight, slowly lower your head and upper back towards the floor, allowing your spine to extend over the roller. Breathe deeply as you extend, focusing the movement in the area directly on the roller.
- Return: Gently return to the starting position. You can roll slightly up and down to target different segments of your mid-back.
Key Insight: The movement should be felt in your mid-back, not your neck or lower back. If you feel strain elsewhere, reduce the range of motion and focus on deep, controlled breathing to help the muscles relax into the stretch.
Common Mistakes and Tips
- Arching the Lower Back: The most common mistake is compensating with the lumbar spine. Keep your abdominal muscles braced to isolate the movement to the thoracic region.
- Rolling Too Fast: This is a mobility exercise, not a race. Slow, deliberate movements are far more effective for encouraging joint movement.
- Poor Neck Support: Cradling your head with your hands prevents neck strain and helps you focus on spinal extension.
For a clear visual on how to perform this safely and effectively, you can watch this demonstration:
Aim for one set of 10-15 slow repetitions daily. Combining thoracic mobility work with strengthening exercises creates a balanced approach to lasting postural improvement.
5. Planks
A cornerstone of core conditioning popularised by military fitness protocols and modern functional training, the Plank is an isometric exercise celebrated for its powerful impact on spinal stability. It involves holding a static position, similar to the top of a press-up, which engages multiple muscle groups simultaneously. Its primary role in posture correction is strengthening the entire core, including the deep transverse abdominis and multifidus muscles, which act as a natural corset for your spine.
This exercise is one of the best posture correction exercises because a strong, stable core is the foundation upon which good posture is built. By reinforcing the muscles that support your trunk, planks help prevent the sagging shoulders and excessive lower back curvature that contribute to poor alignment. Regularly performing planks builds the endurance needed for your muscles to hold an upright posture throughout the day, not just during the exercise itself.
How to Perform Planks Correctly
Proper form is non-negotiable for reaping the benefits of the plank and avoiding back strain. The focus is on creating a perfectly straight line from head to heels.
- Starting Position: Begin on all fours, then place your forearms on the floor with your elbows directly under your shoulders. Clasp your hands together or keep your palms flat on the floor.
- Body Alignment: Extend your legs back one at a time, coming onto the balls of your feet. Your body should form a straight line from your head to your heels.
- Core and Glute Engagement: Actively squeeze your glutes and brace your abdominal muscles as if you are about to be punched in the stomach. This prevents your hips from sagging.
- Hold the Position: Keep your neck and spine neutral by looking at a spot on the floor about a foot in front of your hands. Breathe steadily and hold the position for the desired duration.
- Return: Gently lower your knees back to the floor to exit the pose.
Key Insight: The quality of the hold is far more important than the duration. Holding a perfect plank for 20 seconds is more beneficial than holding a sloppy one with sagging hips for a minute.
Common Mistakes and Tips
- Sagging or Piking Hips: Your hips should remain in line with your shoulders and ankles. Squeezing your glutes is the best way to prevent your hips from dropping.
- Holding Your Breath: Breathe slowly and deeply throughout the hold. Holding your breath can increase blood pressure and reduce stability.
- Letting Your Head Drop: Maintain a neutral spine by keeping your gaze slightly forward on the floor, preventing your neck from straining.
For a visual guide on perfect form, review this video demonstration:
Start with holds of 20-30 seconds, completing 2-3 sets. As your strength and endurance improve, gradually increase the hold time. Building core stability with planks is also a key strategy to help you learn more about how to prevent sciatica pain.
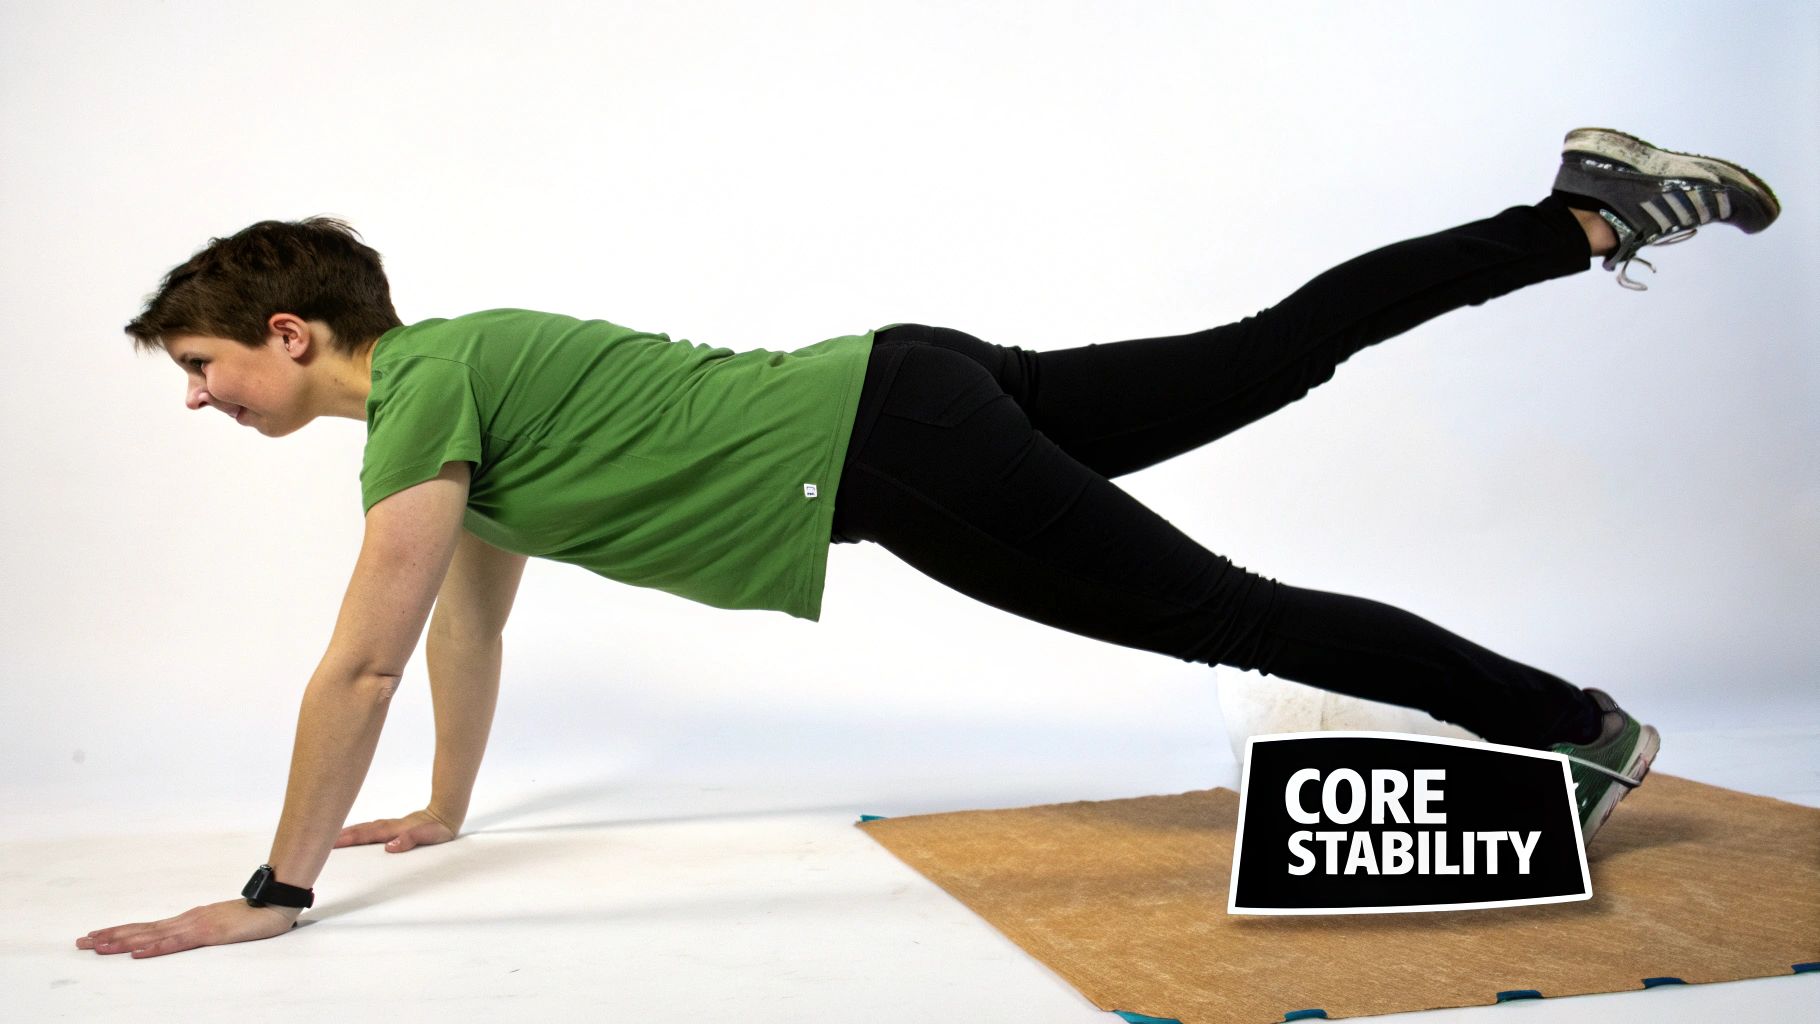
6. Bird Dog Exercise
Praised by spinal health experts and functional movement practitioners, the Bird Dog is a core stabilisation exercise performed from a quadruped (all-fours) position. It involves extending the opposite arm and leg simultaneously while maintaining a perfectly neutral and stable spine. Its purpose is to challenge and strengthen the deep muscles that support the spine, such as the multifidus and erector spinae, which are crucial for maintaining proper upright posture.
The Bird Dog is one of the best posture correction exercises because it teaches the body to resist rotational forces and maintain alignment under dynamic conditions. This improves proprioception (your sense of body position) and enhances coordination between the upper and lower body, directly translating to better posture and balance in daily activities. It is frequently used in rehabilitation settings for lower back issues and is a safe, effective way to build foundational core strength without placing undue stress on the spine.
How to Perform the Bird Dog Exercise Correctly
Proper form is essential to engage the correct muscles and protect your lower back. The focus should be on control and stability, not on how high you can lift your limbs.
- Starting Position: Begin on all fours in a tabletop position. Your hands should be directly under your shoulders and your knees directly under your hips.
- Spinal Alignment: Create a straight line from the crown of your head to your tailbone. Keep your gaze directed towards the floor to maintain a neutral neck position.
- Core Engagement: Gently brace your abdominal muscles, as if you are preparing for a light punch to the stomach. This stabilises your torso.
- The Movement: Simultaneously extend one arm straight forward and the opposite leg straight back. Move slowly and with control, aiming to create a long line from your fingertips to your heel.
- Hold and Return: Pause for a few seconds at full extension, focusing on keeping your hips and shoulders perfectly level. Slowly and smoothly return your arm and leg to the starting position. Repeat on the other side.
Key Insight: Imagine you have a glass of water balanced on your lower back. The goal is to perform the entire movement without spilling a single drop. This mental cue helps prevent any twisting or rotation in your pelvis and spine.
Common Mistakes and Tips
- Arching the Lower Back: Keep your core engaged throughout to prevent your back from sagging as you extend your leg.
- Rotating the Hips: Focus on keeping both hip bones pointing directly down at the floor. Don’t lift your leg so high that your hip opens up to the side.
- Rushing the Movement: Perform each repetition slowly and deliberately. The controlled nature of the movement is what builds stability. The exercise can be highly effective in managing conditions such as those explored in our guide to treating sacroiliac joint pain.
For a visual guide on perfect form, review this video demonstration:
Aim for one set of 8-12 slow repetitions per side. By incorporating the Bird Dog exercise into your routine, you can build a resilient core, improve your balance, and actively correct postural imbalances.
7. Doorway Chest Stretch
Regularly recommended by physical therapy and occupational health specialists, the Doorway Chest Stretch is a simple yet powerful exercise for unwinding postural strain. It directly targets the tight pectoral muscles in the chest and the anterior deltoids at the front of the shoulders. These muscles frequently become shortened and tight from daily activities like typing, driving, or looking down at a phone.
This stretch is one of the best posture correction exercises because it tackles a primary cause of rounded shoulders. When the chest muscles are tight, they pull the shoulders forward and inwards, creating a hunched posture. By methodically lengthening these muscles, this stretch allows the shoulder blades to retract and settle back into a more natural, aligned position, providing a crucial counterbalance to forward-pulling forces. It's a key component in restoring balance across the upper torso.
How to Perform the Doorway Chest Stretch Correctly
Using a standard doorway provides the perfect frame to achieve a deep and effective stretch. Proper form is essential to isolate the chest muscles without straining the shoulder joints.
- Starting Position: Stand in an open doorway. Place your forearms on the door frame on either side, with your elbows bent at a 90-degree angle, roughly at shoulder height.
- Stance: Position your feet in a staggered stance, with one foot slightly in front of the other. This helps you control the intensity of the stretch.
- The Movement: Gently lean your body forward, stepping through the doorway until you feel a comfortable stretch across your chest and the front of your shoulders. Keep your spine neutral and your head in line with your spine.
- Hold and Breathe: Hold the stretch for 30-60 seconds. Focus on taking deep, slow breaths, allowing your muscles to relax and lengthen with each exhalation.
- Release and Repeat: Carefully step back to the starting position. You can repeat the stretch with your arms at different heights (lower or higher than shoulder level) to target different fibres of the pectoral muscles.
Key Insight: The intensity of the stretch should come from your body leaning forward, not from pushing with your arms. The stretch should feel like a gentle pull, never sharp or painful.
Common Mistakes and Tips
- Arching the Back: Engage your core to keep your back straight and prevent overarching, which can put stress on your lower back.
- Shrugging Shoulders: Keep your shoulders relaxed and down, away from your ears. Tensing them negates the purpose of the stretch.
- Overstretching: Pushing too far, too fast can lead to injury. Ease into the stretch and only go as far as you feel a mild to moderate tension.
To see a clear demonstration of this and other foundational movements, watch this helpful video guide:
Aim to perform this stretch 2-3 times throughout the day, especially after long periods of sitting. It's an excellent way to break up your workday and is a cornerstone of any effective routine focused on holistic wellbeing and postural health.
Top 7 Posture Exercises Comparison
| Exercise | Implementation Complexity 🔄 | Resource Requirements ⚡ | Expected Outcomes 📊 | Ideal Use Cases 💡 | Key Advantages ⭐ |
|---|---|---|---|---|---|
| Wall Angels | Low to moderate – requires shoulder mobility | Wall only | Improved shoulder posture, upper back strength | Postural correction for desk workers, warm-ups | Accessible, immediate feedback, combined stretch & strengthen |
| Cat-Cow Stretch | Low – gentle spinal movement | None (floor space) | Enhanced spinal mobility and flexibility | Warm-up, spinal stiffness relief, mind-body connection | Dynamic, breath-coordinated, suitable for all |
| Chin Tucks | Low – simple targeted neck movement | None | Corrects forward head posture, strengthens deep neck flexors | Tech neck, neck pain relief, discreet use | Highly effective for tech neck, quick, no equipment |
| Thoracic Extension Mobility | Moderate – needs foam roller or props | Foam roller/chair recommended | Improved thoracic spine extension and shoulder mobility | Overhead movement improvement, spinal health | Addresses key postural root cause, enhances breathing |
| Planks | Moderate to high – requires core control | None | Stronger core, improved postural endurance | Core strengthening, injury prevention | Full core engagement, scalable difficulty |
| Bird Dog Exercise | Moderate – coordination required | None | Enhanced spinal stability, balance, core-limb coordination | Spinal stability training, rehab, balance improvement | Low load, effective deep muscle activation |
| Doorway Chest Stretch | Low – static stretch | Doorway | Relief from chest tightness, reduced rounded shoulders | Chest tightness, posture imbalance, daily stretch | Directly addresses chest tightness, easy & accessible |
Your Next Step Towards a Pain-Free Posture
You've now explored a powerful arsenal of the best posture correction exercises, from the foundational Wall Angel to the essential Doorway Chest Stretch. Each movement in this guide serves a specific purpose: to reawaken dormant muscles, release chronic tension, and retrain your body to hold itself in its natural, optimal alignment. We’ve moved beyond generic advice, providing you with a detailed roadmap to not just perform these exercises, but to master them. Understanding the nuances of a proper Chin Tuck or the core engagement required for a perfect Plank is what separates temporary relief from lasting transformation.
The true value of this knowledge lies in its application. Think of these seven exercises not as a chore, but as a daily ritual of self-care. They are your tools to counteract the hours spent hunched over desks, steering wheels, and screens. By integrating these movements into your routine, you are actively choosing to build a more resilient and pain-free body. The benefits extend far beyond simply standing taller; improved posture can lead to better breathing, enhanced athletic performance, and a significant reduction in chronic aches and pains that may have plagued you for years.
From Knowledge to Action: Building a Consistent Routine
Consistency is the non-negotiable ingredient for success. Lasting postural change doesn’t happen overnight; it’s the result of cumulative effort. The key is to start small and build momentum.
- Create a "Posture Break" Alarm: Set a recurring reminder on your phone or computer to step away from your desk and perform one or two of these exercises, like the Cat-Cow or a Thoracic Extension.
- Habit Stacking: Anchor your new routine to an existing one. For example, perform Chin Tucks every time you boil the kettle, or do a Doorway Chest Stretch each time you leave a room.
- Listen to Your Body: Progress is not linear. Pay attention to how your body feels. Some days you might focus more on mobility with stretches, while on others you might prioritise strengthening exercises like the Plank and Bird Dog. The goal is progress, not perfection.
When to Seek Professional Guidance
While these exercises provide an exceptional foundation for improving your posture, it's crucial to recognise when a more personalised approach is needed. If you're experiencing persistent pain, severe stiffness, or feel that your postural issues are significantly impacting your quality of life, professional guidance is invaluable. An expert can help identify the underlying structural and muscular imbalances contributing to your discomfort, ensuring you're not just treating symptoms but addressing the root cause. This is particularly important for conditions like chronic lower back pain or sciatica, where incorrect movement patterns can exacerbate the problem. A tailored plan, based on a thorough assessment, ensures your efforts are safe, effective, and targeted precisely where you need them most.
If you're ready to take a definitive step towards a healthier, pain-free life and feel you would benefit from an expert assessment, we are here to help. At Spine, Body & Health, our specialists in Milton Keynes utilise a unique wellness care approach to create a plan specifically for your needs. Visit our website at Spine, Body & Health to learn how we can support your journey back to optimal wellbeing.