Lower back discomfort can significantly impact your daily life, turning simple actions into daunting tasks and diminishing your overall well-being. The good news is that building a strong, resilient lower back is often entirely within your control. A targeted strengthening programme is one of the most effective, non-invasive strategies for managing discomfort and preventing future issues, forming a robust foundation for a pain-free life. Developing this core stability not only supports your spine but enhances your posture and movement efficiency in all activities.
This guide provides a comprehensive roundup of seven foundational exercises to strengthen lower back muscles, all of which can be performed with minimal or no equipment. We will delve into clear, step-by-step instructions for each movement, from the Dead Bug to the Wall Sit. You will also find essential safety tips and practical modifications, ensuring you can perform each exercise correctly and progress at your own pace. While many of these exercises are perfect for an indoor routine, expanding your regimen to include activities at outdoor exercise stations can add variety and new challenges. Whether you're recovering from a minor twinge or proactively building a more robust core and posterior chain, these movements are your blueprint for a healthier, more active life.
1. Dead Bug Exercise
The Dead Bug exercise is a foundational movement for building core stability and is one of the safest yet most effective exercises to strengthen the lower back. It teaches your body to stabilise the lumbar spine and pelvis while your limbs are in motion. This coordination is crucial for protecting your lower back during everyday activities like walking, lifting, or twisting. By focusing on slow, controlled movements, you activate the deep core muscles, including the transverse abdominis, which acts like a natural corset for your spine.

This exercise is a staple in clinical settings for rehabilitating low back pain and is frequently recommended by physical therapists and corrective exercise specialists. It’s prized for its ability to build strength without placing any direct load or strain on the lumbar vertebrae, making it an ideal starting point for those with a history of back issues.
How to Perform the Dead Bug
Follow these steps to ensure correct form and maximise the benefits for your lower back.
- Starting Position: Lie on your back with your knees bent and feet flat on the floor. Raise your legs so your shins are parallel to the floor, creating a 90-degree angle at your hips and knees (the "tabletop" position). Extend your arms straight up towards the ceiling.
- Engage Your Core: Gently press your lower back towards the floor, closing any significant gap. You should feel your abdominal muscles tighten.
- Controlled Movement: Exhale slowly as you lower your opposite arm and leg towards the floor. Go only as far as you can without your lower back arching.
- Return and Repeat: Inhale as you bring your arm and leg back to the starting position with control. Repeat on the other side. This completes one repetition. Aim for 8-12 repetitions per side.
Key Insight: The goal is not to touch the floor with your hand and foot, but to maintain a stable, neutral spine throughout the movement. The moment you feel your back arch, you've gone too far.
Common Mistakes to Avoid
- Arching the Lower Back: This is the most common error and it defeats the purpose of the exercise. It indicates your core is not engaged enough to support the movement.
- Moving Too Quickly: Rushing through the reps relies on momentum rather than muscle control. Slow, deliberate movements are essential for strengthening deep stabiliser muscles.
- Holding Your Breath: Remember to breathe steadily. Exhale on the exertion (as you lower your limbs) and inhale on the return.
If you find the full movement challenging, start by lowering just one arm at a time, then progress to lowering just one leg at a time. Once you master these, you can combine them into the full opposite-arm-and-leg movement.
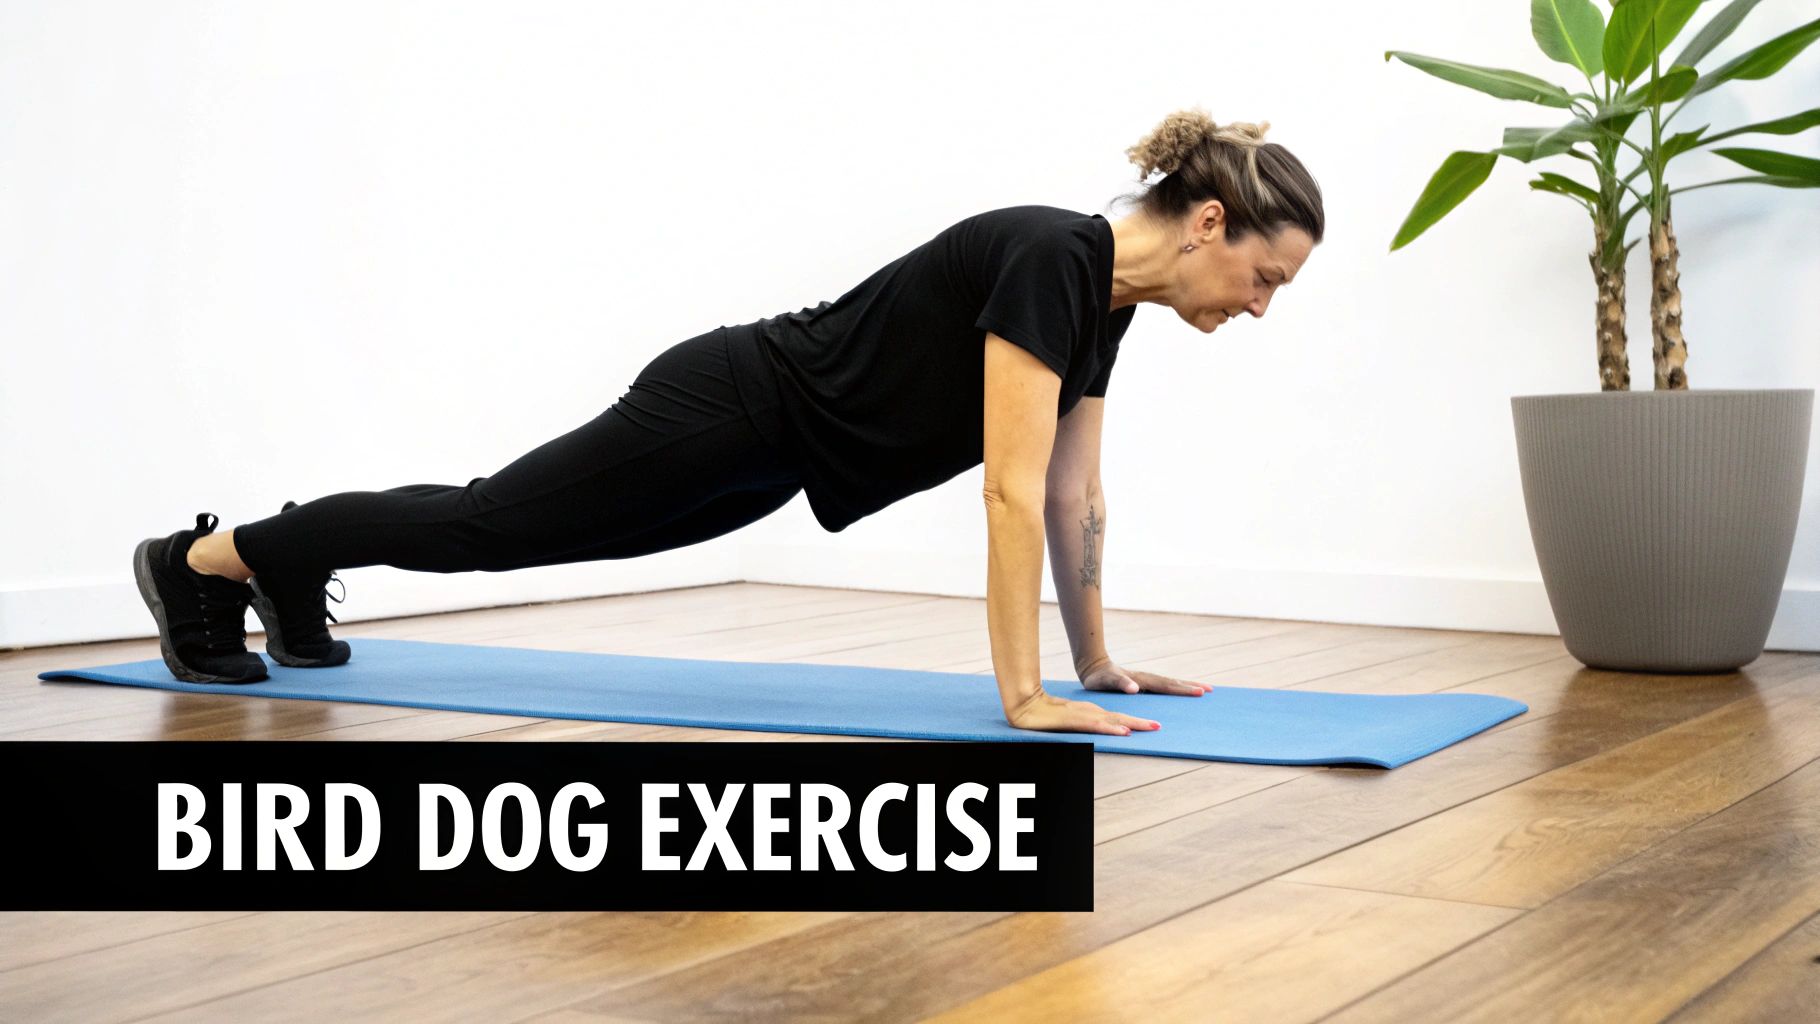
2. Bird Dog Exercise
The Bird Dog exercise is a fundamental movement for improving spinal stability and is widely considered one of the best exercises to strengthen the lower back. Performed on all fours, it challenges your ability to maintain a neutral spine while simultaneously moving opposite limbs. This teaches the deep core muscles, including the multifidus and erector spinae, to work in concert to resist rotational and extension forces, protecting the lumbar spine from unwanted stress.
Popularised by physical therapists and corrective exercise specialists like Gray Cook, the Bird Dog is a staple in both rehabilitation programmes and athletic conditioning. Its effectiveness lies in its ability to enhance proprioception (your sense of body position) and build endurance in the muscles that support your spine, all without placing compressive load on the vertebral discs. It is an excellent way to strengthen core muscles for spinal health and improve overall functional movement.
How to Perform the Bird Dog
Follow these steps to ensure correct form and maximise the benefits for your lower back.
- Starting Position: Begin on your hands and knees in a tabletop position. Your hands should be directly under your shoulders and your knees directly under your hips. Keep your back flat and your head in line with your spine.
- Engage Your Core: Brace your abdominal muscles as if you are about to be pushed from the side. This will help keep your torso stable throughout the movement.
- Controlled Movement: Exhale as you slowly extend your opposite arm and leg straight out, keeping them in line with your torso. Think about reaching away from your body rather than lifting upwards.
- Return and Repeat: Inhale as you bring your arm and leg back to the starting position with control. Repeat on the other side. This completes one repetition. Aim for 8-12 repetitions per side.
Key Insight: Imagine you have a glass of water balanced on your lower back. Your goal is to complete the entire movement without spilling a single drop. This cue helps to minimise any twisting or arching in the spine.
Common Mistakes to Avoid
- Arching the Lower Back: A common error is extending the leg too high, causing the lower back to arch. Only lift your leg as high as you can while maintaining a perfectly flat back.
- Rotating the Hips: As you extend your leg, your hips may try to rotate open. Keep them square to the floor to ensure your core stabilisers are doing the work.
- Moving Too Quickly: Performing the exercise too fast relies on momentum. A slow, controlled pace is crucial for building the muscular control needed to protect your back.
If you find the full movement difficult, start by extending just one arm at a time, then just one leg at a time. This will help you build the foundational stability needed to progress to the full movement safely.
Glute Bridge: Strengthen Your Glutes & Protect Your Lower Back
The Glute Bridge is a fundamental exercise for strengthening the posterior chain, which includes your glutes, hamstrings, and lower back muscles. By activating the gluteus maximus, this movement helps stabilise the pelvis and reduce the strain on the lumbar spine. Weak glutes often force the lower back muscles (erector spinae) to overcompensate, leading to stiffness and pain. The Glute Bridge directly counters this imbalance, making it one of the most effective exercises to strengthen the lower back.

This exercise is widely used in both fitness and clinical settings, from prenatal exercise programmes to rehabilitation protocols for hip and back issues. Its simplicity and effectiveness make it an excellent choice for individuals of all fitness levels, particularly those looking to build foundational strength without placing direct compressive force on the spine. The focus is on controlled glute activation, a key component in improving posture and alleviating low back discomfort.
How to Perform the Glute Bridge
Follow these steps to ensure correct form and maximise the benefits for your lower back.
- Starting Position: Lie on your back with your knees bent, feet flat on the floor about hip-width apart, and your arms resting by your sides with palms down. Your heels should be close enough that you can just about touch them with your fingertips.
- Engage Core and Glutes: Before lifting, gently brace your core as if preparing for a punch. Squeeze your glutes to initiate the movement.
- Lift Your Hips: Exhale as you press through your heels and lift your hips off the floor until your body forms a straight line from your shoulders to your knees. Avoid arching your lower back.
- Hold and Lower: Hold the top position for 2-3 seconds, continuing to squeeze your glutes. Inhale as you slowly lower your hips back to the starting position with control. Aim for 10-15 repetitions.
Key Insight: The movement should be driven by your glutes, not your lower back. If you feel any strain in your lumbar spine, lower your hips slightly and focus more intensely on squeezing your glutes to power the lift.
Common Mistakes to Avoid
- Overarching the Lower Back: Lifting the hips too high can cause hyperextension in the lumbar spine, which places unnecessary stress on it. Focus on creating a straight line from shoulders to knees.
- Pushing with Hamstrings: While hamstrings are involved, the primary driver should be the glutes. If you feel your hamstrings cramping, bring your feet slightly closer to your body.
- Lifting Too Quickly: Using momentum reduces muscle activation. A slow, controlled tempo on both the way up and the way down is crucial for building strength.
To increase the challenge as you get stronger, you can progress to a single-leg Glute Bridge or place a weight across your hips for added resistance.
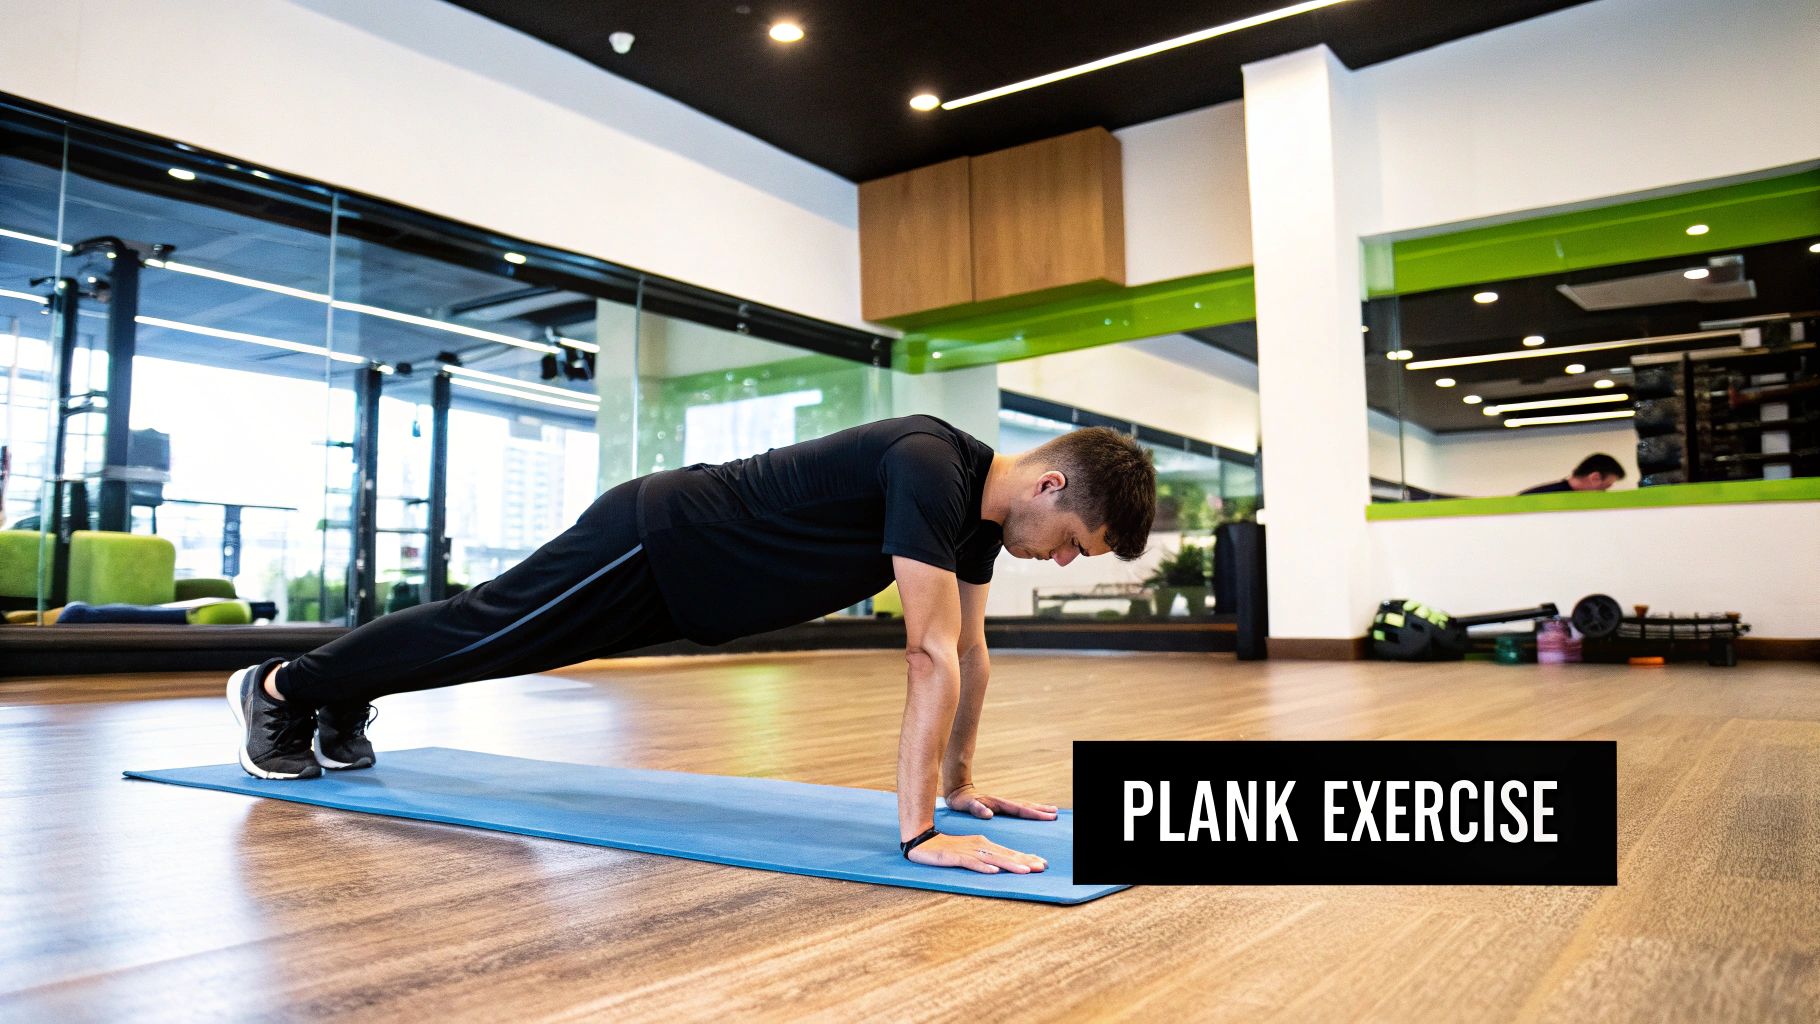
4. Plank
The Plank is a classic isometric exercise renowned for its ability to build exceptional core endurance and spinal stability. It works by engaging multiple muscle groups simultaneously, including the transverse abdominis, rectus abdominis, obliques, and the erector spinae muscles that support your lower back. By holding a rigid, straight line from head to heels, you train these muscles to work together to resist gravity and maintain a neutral spine, a fundamental skill for protecting your lower back from injury.
Unlike dynamic exercises that involve movement, the Plank’s static nature makes it one of the safest and most effective exercises to strengthen the lower back. It builds strength without placing undue stress or shearing forces on the lumbar vertebrae. This is why it’s a cornerstone of military fitness tests, Pilates routines, and rehabilitation programmes designed to manage chronic back pain. Mastering this exercise provides a solid foundation for more complex movements and is a key part of any back care routine.
How to Perform the Plank
Follow these steps to ensure you maintain correct form and engage the right muscles.
- Starting Position: Begin in a push-up position, but place your forearms on the floor instead of your hands. Your elbows should be directly under your shoulders, and your arms should be parallel to your body.
- Engage Your Core: Clasp your hands together if it's more comfortable. Lift your hips off the floor, so your body forms a straight line from your head to your heels. Squeeze your glutes and tighten your abdominal muscles.
- Maintain the Hold: Keep your spine neutral. Do not let your hips sag towards the floor or rise up towards the ceiling. Keep your gaze directed at the floor to maintain a neutral neck position.
- Breathe and Hold: Breathe steadily throughout the hold. Start by aiming for 20-30 seconds, gradually increasing the duration as you get stronger. Focus on maintaining perfect form for the entire time.
Key Insight: The quality of the hold is far more important than the duration. A 20-second plank with perfect form is more beneficial and safer than a 60-second plank with sagging hips.
Common Mistakes to Avoid
- Sagging or Piking Hips: Allowing your hips to drop puts strain on your lower back, while raising them too high (piking) reduces the engagement of your core muscles.
- Holding Your Breath: This increases intra-abdominal pressure and can raise blood pressure. Focus on continuous, calm breathing to supply your muscles with oxygen.
- Letting Your Head Drop: Keep your neck in line with your spine. Looking down at the floor, a few inches in front of your hands, usually helps achieve this.
If a standard plank is too challenging, start by performing it on your knees. This reduces the load while still allowing you to build foundational core strength. Integrating exercises like the plank is an excellent strategy to prevent lower back pain and improve your overall spinal health.
5. Superman Exercise
The Superman exercise is a bodyweight movement performed on the floor that directly targets the posterior chain. This includes the erector spinae muscles that run alongside your spine, the glutes, and the hamstrings. As one of the most effective exercises to strengthen the lower back, it builds endurance in these crucial muscles, which are responsible for maintaining good posture and supporting spinal extension. Regular practice helps counteract the effects of prolonged sitting, such as a forward-hunched posture, by strengthening the muscles that hold your spine in a healthy, neutral alignment.
This exercise is a cornerstone of many back rehabilitation and preventative care programmes due to its simplicity and effectiveness. Because it requires no equipment and uses controlled lifting, it strengthens the back without adding compressive load to the vertebrae. Its similarity to the Locust Pose in yoga makes it a familiar movement for many, valued for its ability to improve spinal stability and core strength from the back of the body.
How to Perform the Superman
Follow these steps for the correct form to safely target your lower back and gluteal muscles.
- Starting Position: Lie face down on a mat with your legs straight behind you and your arms extended in front of you, like Superman flying. Keep your neck in a neutral position by looking down at the mat.
- Engage Your Core: Squeeze your glutes and lower back muscles to prepare for the lift.
- Controlled Movement: Exhale as you simultaneously lift your arms, chest, and legs off the floor. Lift only as high as you can comfortably manage while keeping your neck long.
- Hold and Return: Hold the top position for 2-5 seconds, focusing on the contraction in your back and glutes. Inhale as you slowly lower your limbs back to the starting position with control. Aim for 10-15 repetitions.
Key Insight: The height of the lift is not the primary goal. The focus should be on a controlled, smooth movement and feeling the engagement of your entire posterior chain, not on straining to get your chest and thighs as high as possible.
Common Mistakes to Avoid
- Jerking into the Movement: Avoid using momentum to lift your limbs. The movement should be slow and deliberate to ensure the back muscles are doing the work.
- Straining the Neck: Do not look up or forward. Keep your gaze directed at the floor to maintain a neutral spine from your head to your tailbone, preventing neck strain.
- Forgetting to Engage the Glutes: The glutes are powerful muscles that support the lower back. Actively squeezing them throughout the exercise provides crucial support and reduces strain on the lumbar spine.
If the full Superman is too challenging, you can modify it by lifting opposite arm and leg at the same time, or by keeping your arms by your sides and only lifting your chest and legs.
6. Cat-Cow Stretch
The Cat-Cow stretch, a staple in yoga and physical therapy settings, is a gentle, dynamic movement that is highly effective for improving spinal mobility and relieving tension. It’s not just a stretch; it’s a crucial exercise to strengthen the lower back by encouraging segmental control of the spine and activating deep stabilising muscles. By moving between spinal flexion (Cat) and extension (Cow), you gently mobilise the vertebrae, which can help alleviate stiffness from prolonged sitting or inactivity.
This movement is prized for its accessibility and therapeutic benefits, making it an ideal warm-up before more strenuous exercises or a go-to movement for a morning routine to awaken the spine. Healthcare professionals frequently recommend it to individuals experiencing back stiffness because it promotes blood flow to the muscles surrounding the spine and helps improve body awareness and posture without placing significant strain on the back.
How to Perform the Cat-Cow Stretch
Follow these steps for proper form, ensuring you synchronise your breath with the movement.
- Starting Position: Begin on all fours in a tabletop position. Your hands should be directly under your shoulders and your knees directly under your hips. Keep your head in a neutral position, looking down at the floor.
- Cow Pose: Inhale as you drop your belly towards the floor. Lift your chest and chin, and look up towards the ceiling. Allow your lower back to arch gently without forcing it.
- Cat Pose: Exhale as you round your spine upwards towards the ceiling, tucking your chin to your chest. Imagine pulling your navel towards your spine to fully engage your abdominal muscles.
- Flow and Repeat: Continue to flow smoothly between Cat and Cow, connecting each movement to your breath. Aim for 5-10 slow, controlled repetitions.
Key Insight: The power of this exercise lies in the mindful connection between breath and movement. Let your breath guide the pace, which helps to calm the nervous system and deepen the stretch.
Common Mistakes to Avoid
- Forcing the Movement: Avoid pushing your spine to its absolute limit in either direction. The goal is gentle mobilisation, not extreme flexibility, which could cause strain.
- Moving from the Neck: Ensure the movement originates from your pelvis and travels up the spine. Don't simply crank your neck up and down.
- Moving Too Quickly: Rushing through the poses turns it into a less effective, purely mechanical action. A slow, deliberate pace is essential for neuromuscular re-education and strengthening.
The Cat-Cow stretch is an excellent and safe way to build foundational spinal health, preparing your back for more demanding activities and contributing to long-term resilience.
7. Wall Sit
The Wall Sit is a powerful isometric exercise renowned for building endurance in the legs and core. While it primarily targets the quadriceps and glutes, it's also one of the more deceptive exercises to strengthen the lower back. To hold the position correctly, you must actively engage your deep core and back muscles to maintain a neutral spine against the wall, improving postural strength and stability without dynamic movement.
This exercise is a staple in sports conditioning and physical therapy settings. It builds muscular endurance in the support system for your spine, which is vital for reducing strain during daily activities like standing for long periods or lifting. Because your back is fully supported by the wall, it minimises the risk of improper form, making it a safe yet challenging option for developing foundational strength.
How to Perform the Wall Sit
Follow these steps to ensure you perform the Wall Sit correctly and safely.
- Starting Position: Stand with your back flat against a sturdy, smooth wall. Place your feet shoulder-width apart, about two feet away from the wall.
- Lower into Position: Slowly slide your back down the wall until your thighs are parallel to the floor, as if you are sitting in a chair. Your knees should be directly above your ankles, forming a 90-degree angle.
- Engage and Hold: Press your lower back firmly into the wall and engage your abdominal muscles. Keep your back straight and your head against the wall. Hold this position for a set duration, such as 20-30 seconds, building up to 60 seconds or more over time.
- Return to Start: To come out of the sit, gently push back up the wall to the starting position.
Key Insight: The focus should be on keeping your entire back, from your shoulders to your hips, pressed against the wall. This ensures your core and back muscles are properly engaged to support your spine, not just your legs doing all the work.
Common Mistakes to Avoid
- Leaning Forward: Allowing your shoulders or hips to come away from the wall shifts the load and reduces core engagement, lessening the benefits for your back.
- Knees Past Toes: If your knees extend beyond your toes, it places unnecessary strain on the knee joints. Adjust your foot placement to maintain a proper 90-degree angle.
- Holding for Too Long: Pushing to failure too soon can lead to poor form. Start with shorter, manageable holds and gradually increase the duration as your strength and endurance improve.
To make the exercise easier, don't slide down as far; a 45-degree angle is a good starting point. To increase the challenge, try holding a light weight or crossing your arms over your chest instead of resting them on your thighs.
7 Exercises for Lower Back Strength Comparison
| Exercise | Implementation Complexity 🔄 | Resource Requirements | Expected Outcomes 📊 | Ideal Use Cases | Key Advantages ⭐💡 |
|---|---|---|---|---|---|
| Dead Bug | Low to Moderate 🔄🔄 | Minimal equipment (mat) | Improved core stability, coordination, back safety | Rehabilitation, corrective fitness | Safe for back pain, modifiable, teaches neutral spine |
| Bird Dog | Low 🔄 | No equipment | Enhanced spinal & shoulder stability, proprioception | Rehab, warm-up, functional assessment | Great for beginners, body awareness, portable |
| Glute Bridge | Low 🔄 | No equipment, optional weights | Stronger glutes, hip mobility, improved posture | Prenatal, rehab, athletes warm-up | Easy, multiple progressions, targets hip extensors |
| Plank | Moderate 🔄🔄 | No equipment | Core endurance, posture, spinal stability | Fitness tests, HIIT, chronic back rehab | Builds endurance, trackable, full-body engagement |
| Superman | Low to Moderate 🔄🔄 | No equipment | Posterior chain strength, spinal extension | Back rehab, yoga, desk workers correction | Direct erector strengthening, simple, no gear |
| Cat-Cow Stretch | Very Low 🔄 | No equipment | Improved spinal mobility, reduced stiffness | Yoga, gentle morning routine, elderly | Gentle, improves flexibility, promotes relaxation |
| Wall Sit | Low to Moderate 🔄🔄 | Wall required | Leg and glute strength, postural endurance | Physical therapy, sports conditioning, home | Low impact, easy progress tracking, joint friendly |
Beyond the Exercises: Your Next Step Towards Lasting Relief
You now have a foundational toolkit of seven powerful exercises to strengthen your lower back, from the core-engaging Dead Bug to the mobility-enhancing Cat-Cow stretch. By integrating these movements into your regular routine, you are taking a significant, proactive step towards building a more resilient, supportive, and pain-free back. The key to success lies not in intensity, but in consistency.
Remember, the goal is to create a strong, stable foundation. The exercises detailed in this guide, such as the Glute Bridge and the Plank, are designed to activate and strengthen the deep core and gluteal muscles. These muscle groups act as a natural corset for your spine, providing the stability needed to protect it from the daily stresses of lifting, twisting, and even prolonged sitting. A weak core forces the smaller, more delicate muscles of the lower back to overcompensate, leading to strain, fatigue, and chronic pain.
From Knowledge to Action: Building a Sustainable Routine
Mastering these exercises is more than just learning the movements; it's about understanding the principles behind them. Pay close attention to your form, engage the correct muscles, and listen to your body’s signals.
- Start Slowly: If you are new to these exercises, begin with fewer repetitions and sets. Focus on perfect form over quantity. For example, holding a perfect Bird Dog for 10 seconds is far more beneficial than a wobbly 30-second hold.
- Prioritise Consistency: Aim to perform a selection of these exercises three to four times per week rather than attempting one long, exhaustive session. Consistency is the engine of progress and is crucial for building lasting muscle memory and strength.
- Create a Balanced Programme: Combine stabilising exercises like the Plank with dynamic movements like the Cat-Cow stretch. This ensures you are building both strength and mobility, which are equally important for a healthy back.
This targeted approach to exercises to strengthen the lower back empowers you to take control of your physical wellbeing. It’s a journey of building not just a stronger body, but a deeper connection to how your body moves and functions, paving the way for lasting relief and improved quality of life.
When to Seek Professional Guidance
Consistently performing these exercises is a powerful strategy. However, if your lower back pain is persistent, severe, or radiates down your leg, a self-guided programme may not be sufficient. Understanding the specific root cause of your discomfort is paramount for effective, long-term recovery. An ache or pain is your body's way of signalling that something isn't right, and ignoring it can lead to more significant issues.
A comprehensive assessment from a trained specialist can identify underlying structural or biomechanical issues that exercises alone may not resolve. They can provide a precise diagnosis and create a personalised treatment plan tailored to your unique condition and wellness goals. This ensures you are not just managing symptoms but are actively correcting the source of the problem. Don't let chronic pain dictate the terms of your life.
Ready to move beyond temporary fixes and find a permanent solution to your back pain? The specialists at Spine, Body & Health use advanced diagnostics and a unique wellness care approach to identify and treat the root cause of your discomfort. Book a consultation today at Spine, Body & Health to begin your journey towards living pain-free.